¶ Getting Started
¶ Initial Setup
¶ Overview
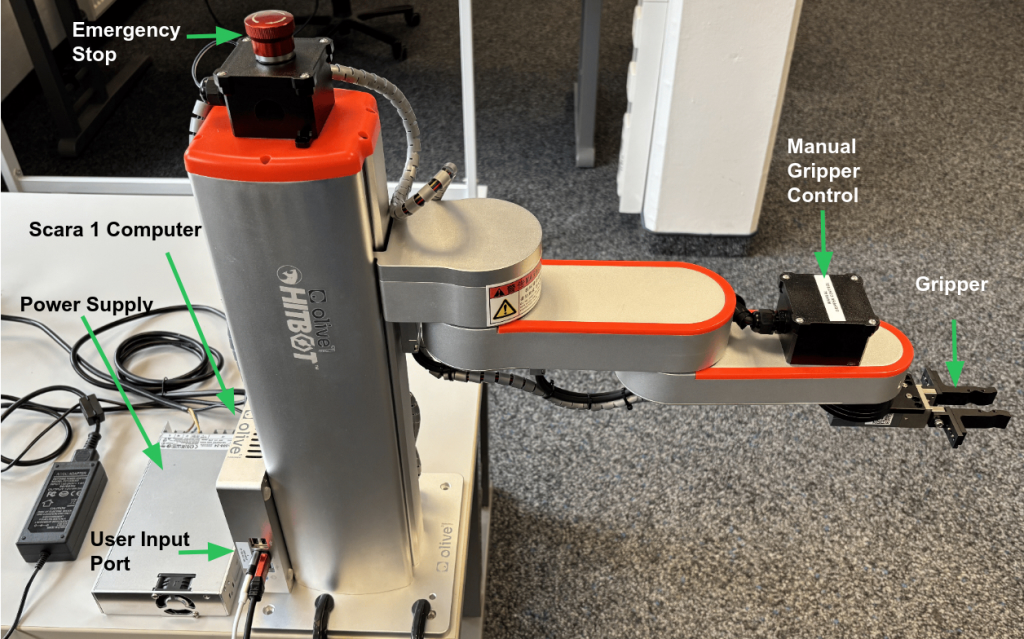
¶ Power On
¶ Setup
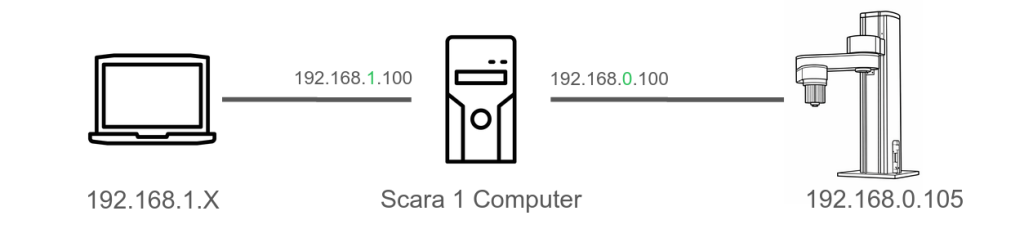
The robot always uses the fixed IP address 192.168.0.105.
The supplied Scara 1 computer has two network connections:
- One connected to the robot with IP 192.168.0.100
- One connected to the host system with IP 192.168.1.100 (Optional)
You can connect an additional computer via USB-to-Ethernet (the USB port is labeled on the Scara 1 computer). Configure this computer with a static IP address in the range 192.168.1.X (with X ≠ 100) and the subnet mask 255.255.255.0.
To control the robot via ROS 2 topics, services, or the Web UI, you can either use the Scara 1 computer or your own connected device.
The credentials for the Scara 1 Computer are: Username: olive, Password: one.
The following video shows how to connect an additional computer via USB-to-Ethernet. Please use the supplied USB-to-Ethernet adapter; otherwise, you may need to reconfigure the IP address on the Scara 1 computer.
Important: Every time you change the network setup (for example, connecting or disconnecting an additional computer), you must restart the services via the Web UI or by running ./restart_scara_services.sh on the Scara 1 computer in the home directory. (See Troubleshooting for more information.) If you connect the additional computer later, SSH into the Scara 1 computer (ssh olive@192.168.1.100, password: one) and run ./restart_scara_services.sh. This action cannot be performed from the Web UI.
¶ Robot Control
There are two different ways to control the Robot.
- Via Web-UI
- Via ROS 2 Service Calls
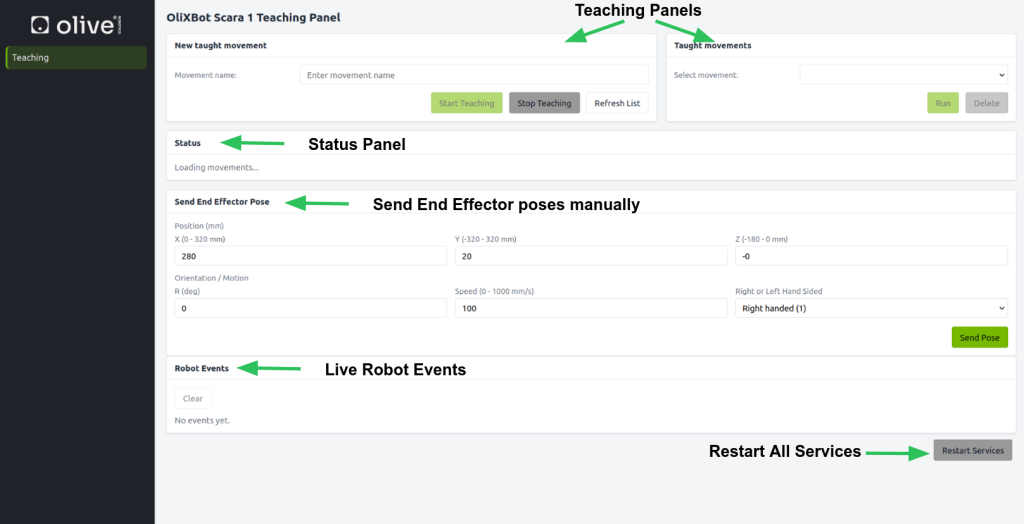
¶ Web-UI
The Web UI can be accessed via 192.168.1.100:3000 or locally on the Scara 1 computer at localhost:3000.
¶ ROS 2
To install the ROS 2 interfaces on your host system, follow this link.
¶ General
Hint: The Scara 1 computer runs on Cyclone DDS. To discover and call ROS 2 services from your host, use Cyclone DDS there as well.
Because Cyclone DDS can be sensitive to network changes, stop the ROS 2 daemon first, change the network, and then start the daemon again.
# 1. Stop ros2 daemon
ros2 daemon stop
# 2. Change network settings
# 3. Start daemon again
ros2 daemon start¶ Topics
| Topic | Type | Description |
|---|---|---|
| /events | n1_interface/msg/RobotEvent | Shows Robot Events (e.g. Pose out of range) |
¶ Services
| Service | Type | Description |
|---|---|---|
/start_teaching |
n1_interface/srv/Teaching | Puts the robot into teaching mode |
| /stop_teaching | std_srvs/srv/Trigger | Exits teaching mode |
/run_teached_movement |
n1_interface/srv/Teaching | Executes the taught sequence |
/delete_movement |
n1_interface/srv/Teaching | Deletes a stored taught movement |
/list_all_teached_movements |
n1_interface/srv/ListTaughtMovements | Lists all saved taught movements |
/open_gripper |
std_srvs/srv/Trigger | Opens the robot gripper |
| /close_gripper | std_srvs/srv/Trigger | Closes the robot gripper |
/new_movej_angle |
n1_interface/srv/NewMovejAngle | Creates a new joint-space movement using joint angles |
new_movej_xyz_lr |
n1_interface/srv/NewMovejXYZ | Creates a new joint-space movement using Cartesian XYZ and left/right configuration |
¶ Teaching
With the Teaching mode it is possible to teach the robot a grasping sequence and let the robot rerun it.
Hint: During the teaching process, you can move outside the robot’s motion range, which can later cause issues when rerunning a taught movement. During training, monitor out-of-range events either in the Web UI or on the ROS 2 topic /olive/olixBot/scara1/id_001/events.
You can start the Teaching mode via Web UI or via a specific ROS 2 Services:
¶ Web-UI
¶ ROS 2 Services
The teaching process via ROS 2 works the same like shown in the video above just using ROS 2 services.
To start a teaching process, run the following service:
ros2 service call /olive/olixBot/scara1/id_001/start_teaching n1_interface/srv/Teaching "name: 'teaching_1'"To stop the teaching process, run the following service:
ros2 service call /olive/olixBot/scara1/id_001/stop_teaching std_srvs/srv/TriggerTo run the taught movement, run the following service:
ros2 service call /olive/olixBot/scara1/id_001/run_teached_movement n1_interface/srv/Teaching "name: 'teaching_1'"¶ Error Codes
The error codes can be seen either by the events topic or in the Web UI
| Code | Description |
|---|---|
| 0 | The robot is executing other instructions, this instruction is invalid. |
| 1 | This instruction is valid, the robot starts moving. |
| 2 | Speed is set to zero or less |
| 3 | The robot is not initialized |
| 4 | The target point cannot be reached |
| 6 | Servo is not enabled |
| 7 | Unable to reach the target point with the specified hand orientation |
| 99 | Emergency stop |
| 101 | Invalid parameter, NOT A NUMBER |
| 102 | Collision occurred, this instruction is invalid |
| 103 | Axis reset occurred, reinitialization is needed, this instruction is invalid |
¶ Troubleshooting
¶ Reboot
If the robot stops working or the emergency button has been pressed, the robot must be rebooted. However, the Scara 1 computer does not need to be restarted. In this case, it is sufficient to restart the services and reboot the robot.
The restart can be performed either via the Web UI or by running the script ./restart_scara_services.sh on the Scara 1 computer in the home directory.
This process will restart and reinitialize Scara 1.
¶ Logging
If you want to see the output of the ROS 2 service which runs the whole Scara 1 logic you can do this in the Scara 1 Computer via following command
journalctl -u scara_ros.service -f