¶ Welcome to Olive Robotics
This documentation provides comprehensive information about Olive Robotics' advanced modular robotics platform. Our mission is to empower professionals, researchers, educators, and developers with high-performance, interoperable hardware and software tools to accelerate the development and deployment of robotic systems.
Olive Robotics offers a versatile portfolio of modular components—including sensors, actuators, communication interfaces, processing modules, power supplies, and system-on-modules (SoMs)—all designed with native ROS 2 integration. These modules are engineered to enable scalable, flexible, and high-performance robotics solutions across various applications.
In addition to hardware, we provide a suite of ROS 2-based software packages, including applications and example projects, to support the configuration, programming, and real-time control of robotic systems.
Within this documentation, you will find detailed technical specifications, setup instructions, usage guidelines, and development resources. Use the navigation panel on the left to explore different sections, or leverage the search bar to quickly locate specific topics.
For further assistance or technical support, please contact us at support@olive-robotics.com. Our team is committed to ensuring your success with our technologies.
Thank you for choosing Olive Robotics. We look forward to supporting your innovation in robotics.
¶ Overview
At Olive Robotics, our mission is to make robotics accessible and affordable for everyone. We believe that robotics has the potential to transform our world and improve our lives in countless ways, and we want to help make that happen.

In addition to our hardware products, we also provide ROS 2-based apps and example packages to help you program and control your robotic systems. Our web-based GUI provides a wide range of capabilities for configuring, controlling, and testing components, and our example packages in C++ and Python provide a practical starting point for using our hardware.
Overall, our products and services make it possible to create complex and intelligent robotic systems in days or weeks, instead of months or years. Whether you are a student, researcher, developer, or hobbyist, Olive Robotics can help you to unlock the potential of robotics and make your vision a reality.
Start with one of the following options to get started with your Olive components:
- Run through the Quick Start guide to connect to your device and start reading data—no programming is required.
- Jump into the full tutorial and documentation for each component for more information and advanced concepts (menu on the left).
- Start with one of the customizable Olive kits complete with example ROS2 codes to hit the ground running, and then modify to suit your needs. (menu on the left)
- Pick one of our example packages written in C++ and Python and dive right into software development.
¶ Next Steps
After becoming familiar with the basic functions of Olive components, there are multiple ways to communicate and configure their behavior.
¶ Olive Robot Components
Our robot components are the foundation of our modular robotic building blocks, and they provide the physical sensors, actuators, and other components that you need to build and program your own robotic systems. The menu on the left gives you access to dedicated instructions for each of our hardware products, including technical specifications, user instructions, and examples.
¶ Olive Embedded Web-based Graphical User Interface
The Olive Embedded web GUI is a user-friendly interface for configuring, controlling, and testing our modular robotic building blocks. It provides a wide range of capabilities for setting up and controlling our hardware components, including setting parameters, sending commands, and visualizing sensor data.
This web GUI is a web service that runs directly on the Olive hardware module, and it connects to your host PC over a standard Ethernet connection (via the USB-C connector). This means that you can access and control our hardware components from any web browser, on any device, without having to install any additional software.
To access the web GUI, connect the Olive component to your computer using a standard USB-C cable and wait for it to appear in your network devices. Then enter the default IP address 192.168.7.100 (older versions: 10.42.0.7) in your web browser.
¶ Olive ROS2 Software Packages and Examples
ROS and ROS2 are a core part of the Olive range of products and every Olive hardware component runs ROS out of the box - no setup required.
The Olive ROS2 software packages and examples are a key part of our product offering, and they provide everything you need to start programming and controlling your robotic systems with our hardware. Our ROS2 packages provide examples of using our hardware in action. They are designed to be easy to use and available in both C++ and Python, so you can choose whichever language you are most comfortable with.
In addition to the examples, we also provide a range of tools and utilities to help you work with our ROS2 packages. These include scripts for building and running the examples, as well as utilities for monitoring and debugging your code.
For more information please visit our github page:
¶ What is Olive Robotic Component?
Olive One is a brand of Smart Interoperable Components developed by Olive Robotics GmbH for use in any robotic system.
- All-in-one module with a variety of elements required to drive a robot without other devices. All you need is a host PC with a USB C port and ROS communication to operate a robot.
- We offer various source codes and tools to help first-timers with Olive to operate a robot within a day.
- Olive is compatible with any system or host controller. All you need is a ROS2 framework and communication to operate a robot made with Olive modules.

The modules can also be daisy-chained and connected to each other:
¶ Communication
Modules are connected to host computers via standard USB Type C and standard commercially available HUB equipment with PD support. In the host computer network, every client needs to obtain an IP address in order to communicate with the main PC or with other connected modules. If there is only one module connected to the main PC, the module will get an IP address automatically from the host PC. If more than one module is connected to the computer and user wants to establish a network along all the modules, the bridge connection must be established in the main PC.
Olive Components are designed for broad compatibility and seamless integration with a wide range of hardware platforms. They work with nearly any system that offers a USB or Ethernet interface, including commercial laptops, desktop PCs, mini PCs, and industrial PCs. We have also successfully tested Olive Components on popular IoT devices such as the Raspberry Pi 4 and 5, Siemens IOT 2050, and numerous others, ensuring stable and reliable performance across diverse use cases and environments.
| Hardware | Note | Information |
| AMD/Intel Laptops and PCs (x64) | Ok | Native Support |
| Apple Mac and Apple Silicon (Intel, arm) | Ok | Using Parallels Desktop |
| Windows Computers | OK | Using Virtual Box |
| Raspberry Pi (3,4,5) | Ok | Native Support |
| NVIDIA Jetson (Nano, TX1, TX2, Xavier) | Ok | Native Support |
| Intel N100 Industrial IOT Computers | Ok | Native Support |
| Intel NUC Mini Computers | Ok | Native Support |
| Intel Compute Stick | Ok | Native Support |
| Siemens IOT 2050 | Ok | Native Support |
| Adlink Computers | Test in progress | - |
| Bosch Rexroth Computers | Test in progress | - |
| Nvidia Orin Series | Ok | Native Support |
¶ Quick Start
¶ Quick Info
Find the most relevant information below and the quick setup guide in the following section.
If you are using Ubuntu 22.04, use ROS 2 Humble and select the Humble distribution in the GUI for the sensor.
If you are using Ubuntu 24.04, use ROS 2 Jazzy and select the Jazzy distribution in the GUI for the sensor.
Do not mix humble and jazzy in your setup!
| Item | Value |
|---|---|
| Default Device IP address | 192.168.7.100 |
| Default Host IP address | 192.168.7.200 |
| Web GUI address | http://192.168.7.100 |
| User name | olive |
| Password | one |
| ROS2 Version (native) | Humble / Jazzy |
| Default ROS topic names | /olive/<device type>/<device id>/<parameter> |
| Base OS | Debian 11 Bullseye |
¶ Setup
This quick start guide shows you how to get any Olive Robotics component up and running:
- Install ROS 2 (https://docs.ros.org/en/humble/index.html) on your host computer. This provides the necessary tools and libraries to communicate with Olive Robotics modules from your host computer.
- Connect the Olive Robotics modules to your host computer using the USB Type C cables.
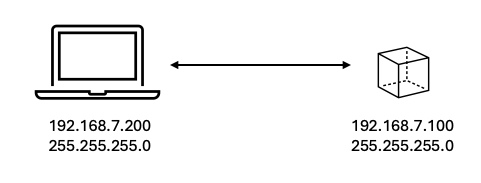
- Wait for the Olive component to boot and establish a connection to your computer. This may take up to 30 seconds. Each module ships with a default static IP address. The default address for smart components is
192.168.7.100. You can change it later via the web interface. Set a static IP address of192.168.7.200on your host computer.
You can check if the connection is established in two ways:
- ping the device using the following command in your terminal:
ping 192.168.7.100If the module is connected successfully, you should see something like this:
PING 192.168.7.100 (192.168.7.100) 56(84) bytes of data.
64 bytes from 192.168.7.100: icmp_seq=1 ttl=64 time=0.402 ms
64 bytes from 192.168.7.100: icmp_seq=2 ttl=64 time=0.371 ms
64 bytes from 192.168.7.100: icmp_seq=3 ttl=64 time=0.397 ms
64 bytes from 192.168.7.100: icmp_seq=4 ttl=64 time=0.398 ms
- Check if the network adapter is attached and recognized by your host computer.
ifconfigIf the device is recognized successfully, you should see something like this:
enxa8de9b838d35: flags=4163<UP,BROADCAST,RUNNING,MULTICAST>  mtu 1500
        inet 192.168.7.200  netmask 255.255.255.0  broadcast 192.168.7.255
        inet6 fe80::ef0a:e686:27aa:6307  prefixlen 64  scopeid 0x20<link>
        ether a8:de:9b:83:8d:35  txqueuelen 1000  (Ethernet)
        RX packets 1846  bytes 272143 (272.1 KB)
        RX errors 0  dropped 0  overruns 0  frame 0
        TX packets 195  bytes 34984 (34.9 KB)
TX errors 0 dropped 0 overruns 0 carrier 0 collisions 0Note that the MAC-based interface name of Olive components shown next to ether ... typically starts with enx.
- Check if the data is already being published via ROS2 to your system using:
ros2 topic list. You should be able to see all the topics published from the module. For example for IMU module you will see: - Visualize the data using RQT, RVIZ2, or Foxglove.
- Visualize the data and change the parameters like IP address, topic name, etc. using the embedded web interface. You just need to open your browser on your host computer and enter the IP address of the device. If you didn't change the IP address, then it must be the default IP address
192.168.7.100.
¶ Want to explore more?
- Install the Olive Robotics ROS2 example packages. This will provide the necessary code and examples to access the data and functionality of the Olive Robotics modules on your host computer. You can find them at https://github.com/olive-robotics.
- Launch the ROS2 examples for the Olive Robotics modules that you want to use. This will start the communication between the modules and your host computer, and will provide access to the data and functionality of the modules.
- Use the ROS2 software to configure the settings and parameters of the Olive Robotics modules, such as the sample rate and range for the sensors and actuators.
- Use the ROS2 tools to view and analyze the data from the Olive Robotics modules, and to troubleshoot any issues or problems.
- If you need more control over the device you can use the secure shell SSH to log into it from your host computer. To do so, use the user name
oliveand passwordone.
¶ FAQ
¶ 1) Why am I facing disconnection after a few minutes?
Please make sure you assign a static IP to your computer interface (example: 192.168.7.200).
- Go to the network settings of your computer where the IMU is connected.
- Select the settings of the Ethernet USB interface.
- Select the IPv4 tab in the settings.
- Assign a static IP address. If you are using the default IP of the sensor, set the IP of the PC to 192.168.7.200.
- Disconnect and reconnect your sensor from the USB port.
- Done!
¶ 2) Why is the device not publishing any topics?
¶ (a) Possible Problem 1:
On your main computer, it’s essential to ensure that the ROS_LOCALHOST_ONLY environment variable is always set to 0. In ROS 2, ROS_LOCALHOST_ONLY, when set to 1, restricts all ROS 2 communication—including topics, services, and actions—to the local loopback interface (localhost), making them invisible to other machines on the network. The default value is 0, which allows ROS 2 communication to operate over the network as intended. Setting it to 0 ensures that the system remains discoverable and can interact properly in multi-machine setups.
¶ (b) Possible Problem 2:
To ensure optimal performance, make sure your main computer uses the same DDS middleware as the device. By default, Olive devices use Fast DDS, but Cyclone DDS is also supported. If you switch to Cyclone DDS, configure it consistently on both sides and explicitly set the active network interface IP when multiple interfaces are present. This ensures reliable discovery and topic visibility. Follow the steps in Data Distribution Service (DDS).
¶ (c) Possible Problem 3:
The ROS_DOMAIN_ID environment variable defines the DDS domain in which your ROS 2 nodes communicate. All nodes with the same ROS_DOMAIN_ID can discover and interact with each other, while nodes in different domains remain isolated. For multi-machine communication to work, your main computer’s ROS_DOMAIN_ID must exactly match the value set on any other host you want to connect with. If the IDs differ, discovery will fail, and the systems will operate as if on separate networks—even if they share the same physical connection.
¶ (d) Possible Problem 4:
Sometimes you have to restart your ROS 2 daemon.
ros2 daemon stop
ros2 daemon start¶ (e) Possible Problem 5: (When you run ROS 2 inside Docker)
When running ROS 2 inside Docker, you must use host networking, otherwise DDS discovery (which ROS 2 relies on) will not work properly.
Please run your container like this:
docker run --rm -it --network host <your-image>Without --network host, Docker isolates the network and blocks the multicast/UDP discovery used by ROS 2 — this is why you can ping the sensor but don’t see any topics.
¶ (f) Possible Problem 6:
Sometimes the ROS 2 CLI does not show topics even though they are available in rqt. This is a known ROS 2 CLI issue. Double-check using the Topic Monitor plugin in rqt.
rqt
¶ 3) IMU AHRS data is freezing when my robot spins at a constant low speed (around 0.1 rad/s)
The automatic background calibration detects it as stationary and suppresses the gyro output.
We recommend that if you need the raw sensor data without this effect, you should refer to the filtered_IMU stream instead of filtered_AHRS.
This gives you direct access to the accelerometer and gyroscope data without the aggressive bias correction.
Additionally, you can adjust the yaw sensitivity in filtered_IMU using the fusion_gain parameter:
A higher fusion_gain makes the system more responsive to motion.
A lower fusion_gain makes the output more stable but slower to respond.
¶ 4) How can I publish IMU data using a custom protocol or custom message format?
You can run a custom Python bridge directly on the IMU device (no firmware modification required). The bridge subscribes to the internal ROS 2 IMU topic and forwards data to your external system (for example UDP JSON or an RTI-side publisher).
See: Custom IMU Message Bridge (UDP / RTI Context)