¶ Firmware Update
¶ Release 2500 (Download)
Release 2500 improves IMU integration, WebGUI configuration, timing behavior, ROS 2 interoperability, and parameter reliability after software updates.
| Category | Update | Description |
|---|---|---|
| New Feature | Coordinate Frame Modes | Added selectable IMU frame modes: FLU_LEGACY for existing projects, FLU for ROS REP-103 body-frame integrations, and FRD for aerospace-style integrations. |
| New Feature | IMU JSON Socket Export | Added optional UDP or TCP export for IMU data so non-ROS applications can receive the stream as JSON. |
| New Feature | RMW Zenoh Support | Added support for rmw_zenoh for flexible and efficient ROS 2 communication. |
| Performance | Lower Latency | Optimized data pipeline for faster sensor output. |
| Performance | Improved Timestamp | Enhanced timestamp accuracy for better synchronization. |
| Algorithm | Olive AI Fusion 2.0 | Improved fused IMU stability with stronger outlier handling and temperature compensation. |
| Configuration | Clock Adjustment | Added clock alignment tuning for improved time consistency. |
| Visualization | Improved Euler Visualization | More stable and intuitive orientation representation in WebGUI. |
| Data Format | Magnetometer in Tesla | Magnetometer output standardized to Tesla (T). |
| Reliability | Parameter Page After OTA | The parameter page no longer stays blocked while child ROS parameter services are still starting after an OTA update. Failed writes are reported and the UI restores the last confirmed value. |
| Platform | X1-Ultra Optimization | Improved performance and stability for X1-Ultra. |
| Documentation | Version 3.0 | Updated X1, X1 Pro, and X1 Ultra documentation with current topics, parameters, coordinate frames, acceleration sensitivity, and socket export guidance. |
| Support | Enhanced Support | Improved diagnostics and maintainability. |
¶ WebGUI Additions
- Coordinate frame selection directly from the IMU debug page.
- Accelerometer sensitivity (+/-g) selection from the IMU debug page.
- IMU parameter profile selection from WebGUI.
- IMU JSON socket export configuration from WebGUI, including enable, protocol, and port.
- Topic name change support from WebGUI with restart/reboot apply flow.
- Better internal configuration file browser for DDS and environment variables.
¶ IMU JSON Socket Export
The IMU can now expose its data without ROS 2. Enable Socket Export in the IMU debug page, select UDP or TCP, and choose the port that the IMU service should listen on. The client application connects from the other computer to the robot IP and configured port.
- TCP: connect to the configured robot IP and port. The IMU sends newline-delimited JSON messages.
- UDP: send any small packet to the configured robot IP and port first. The IMU registers that address and then sends JSON datagrams back to the client.
- JSON schema:
olive_imu.v1, withstamp,frame_id, orientation, angular velocity, linear acceleration, and covariance arrays.
¶ What to Consider
- Frame compatibility: existing projects can keep FLU_LEGACY. New ROS integrations should normally use FLU unless a different convention is required.
- Restart required: coordinate frame, topic naming, socket export, and some IMU settings require a service restart to apply.
- Parameter page after OTA: the page loads even while child parameter services are still starting. If a target node is not ready, WebGUI reports the failed write and restores the previous displayed value.
- Magnetometer units: consumers should interpret magnetometer values in Tesla (T).
¶ Release 2177 (Download)
Patch 2177 delivers a refreshed interface, sizable performance wins and full cross‑platform support, while laying the groundwork for upcoming advanced IMU features.
How to install Jazzy build of IMUs without Jazzy distro?
| Area | What’s new |
|---|---|
| Look & Feel | Brand‑new adaptive UI theme |
| Performance | Up to 20% lower RAM footprint and 20 % faster operation. |
| Stability | 30+ bug fixes across the stack |
| Inter‑operability | Simultaneous ROS 2 Humble & Jazzy workspaces |
| Time‑Sync | Built‑in PTP & NTP daemons with automatic master detection |
| Platforms | MacOS, Linux, Windows |
| Connectivity | Native ECM & RNDIS USB gadget modes; hot‑plug just works |
| Hardware Serial | DFU over hardware serial for every Olive component |
| Visualisation | Real‑time 3D IMU viewer with quaternion/Euler overlays |
| Network Stack | Upgraded to v2.0 |
| Parameters | Cleaner, hierarchical parameter tree |
| Docs | Documentation v2.0 with new quick‑start |
| Hardware | Verified with Olive IMU, Camera, Servo X1 & X1-Pro |
¶ Releases History
| Format | Version | Min Firmware | Link | Component | ROS 2 | Note |
|---|---|---|---|---|---|---|
| SWU | 2177 | 3.2.0 | download | IMU / CAM / Servo | Humble / Jazzy | LTS EOL 2026 |
¶ 1) If you are updating a patch for the first on a fresh OlixOS
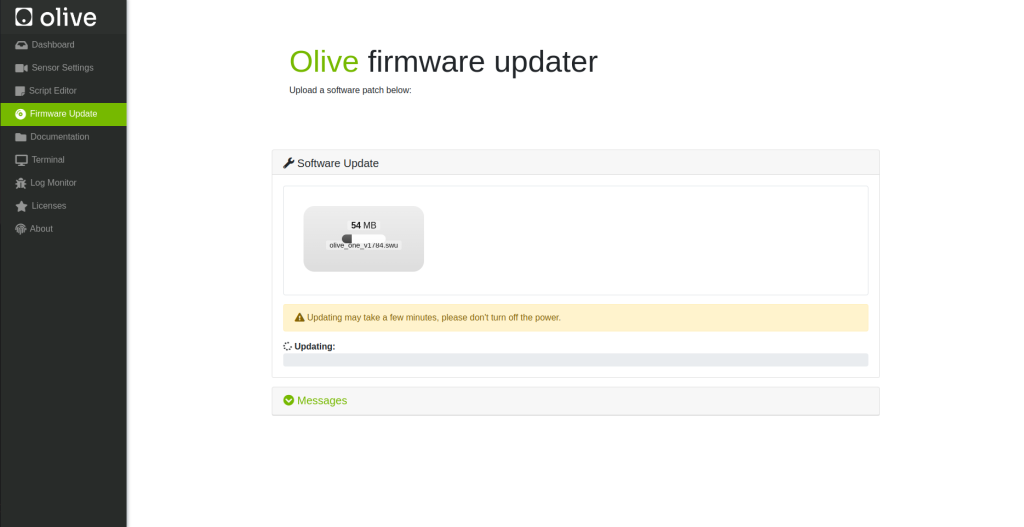
First, open the update screen in your browser by going to <device_ip>:7070.
then browse or drag and drop the (.swu) file olive_one_x.swu to the upload area. Then wait for a minute to software patch updater applies the software patch on your fresh OlixOS.
¶ 2) If you are updating a patch on a working OlixOS
First, open the update screen by going to <device_ip>, then select Firmware Update from the left panel.
then browse or drag and drop the (.swu) file olive_one_x.swu to the upload area. Then wait for a minute to software patch updater applies the software patch on your current OlixOS.
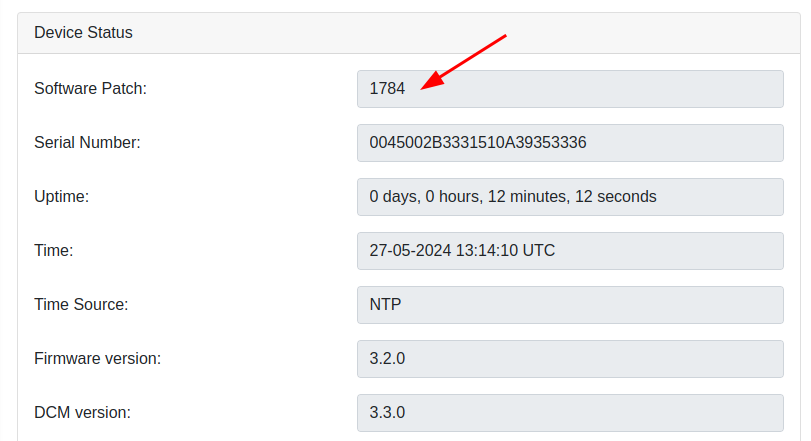
¶ How can I see my current software patch?
In the Olive GUI dashboard in the device status group box you can see your current software patch version.
¶ olixOS Releases (Deprecated)
We have switched to eMMC memory, and this is for the old SD card version components.
| Format | Version | Link |
|---|---|---|
| Compressed IMG | 1.3.2 | download |
| Compressed IMG | 2.2.0 | download |
| Compressed IMG | 2.2.1 | download |
¶ How can I see my current software patch?
In the Olive GUI dashboard in the device status group box you can see your current firmware version.
¶ Flashing a New Image with Etcher Software
¶ Introduction
Etcher is a free and open-source utility used to write image files such as .iso and .img files, as well as zipped folders onto storage media to create live SD cards and USB flash drives. It's widely used to flash OS images for Raspberry Pi, Arduino, and many other applications. Etcher is developed by balena, and it's available for Windows, macOS, and Linux.
¶ Prerequisites
- An image file you want to flash, typically with a
.isoor.imgextension. (unzip the firmware file if it is compressed) - A USB drive or SD card with enough storage to accommodate the image file. (32 Gb or more)
- A computer with Etcher installed.
¶ Step-by-Step Guide to Flashing an Image with Etcher
¶ Step 1: Download and Install Etcher
- Navigate to Etcher's official download page.
- Choose the version of Etcher that corresponds to your operating system (Windows/macOS/Linux).
- Download the installer and run it. Follow the on-screen instructions to install Etcher on your system.
¶ Step 2: Prepare Your USB Drive or SD Card
- Insert the USB drive or SD card into your computer.
- Ensure that there is no important data on the drive, as the flashing process will erase everything on it.
¶ Step 3: Open Etcher and Select Image
- Open Etcher on your computer.
- Click on the “Flash from file” button.
- Navigate to the location where your image file is stored, select it, and click “Open” (or an equivalent, depending on your OS).
¶ Step 4: Select Target
- Click on the “Select target” button.
- Choose your USB drive or SD card from the list. Be very careful to select the correct drive, as all data on the drive will be erased.
- Click “Connect” (or equivalent).
¶ Step 5: Flash the Image
- Click on the “Flash!” button.
- Etcher will format the drive and write the image file to the USB drive or SD card. This process may take some time, depending on the size of the image file and the speed of the drive.
- Once the flashing process is complete, Etcher will validate the write to ensure it was successful.
¶ Step 6: Eject Safely
- Once the flashing process is complete and validated, you can close Etcher.
- Eject the USB drive or SD card safely from your computer.
¶ Step 7: Use the Flashed Drive
- You can now use the USB drive or SD card to boot a computer or power a device (such as a Raspberry Pi) depending on the image you flashed.
¶ Troubleshooting Tips
- If Etcher fails to flash the image, try using a different USB port or card reader.
- Ensure that the image file is not corrupted. You might re-download the file or check its integrity if possible.
- Make sure your USB drive or SD card has enough space for the image file.
- If you experience persistent issues, consult the Etcher's GitHub repository or community forums for assistance.
¶ Environment Variables
In Olive components the permanent Environment Variables are located in:
Humble:
/opt/olive/script/env_humble.shJazzy:
/opt/olive/script/env_jazzy.sh
In order to add your custom Environment variable you should declare it in this script, for example:
declare -x ROS_DOMAIN_ID="0"
¶ Network Configuration
¶ 1) Independent device connection
You can set and update your device IP, netmask and gateway from the device dashboard GUI. More information Here:
¶ 2) Multi-Device Interoperability
¶ Multi-Device / Servo Daisy Chain
When you connect multiple Olive components to your computer, they will appear as several Ethernet devices in your network adapter settings. In this configuration, it's necessary to either set up an internal network bridge or define static routes to ensure all devices are properly connected to your computer and can be pinged.
Daisy chain means you have an Olive servo in your setup, and therefore you will also need the Olive power splitter. You can see an example network diagram below. Please note that the Olive camera in daisy-chain mode works automatically, but for the IMU you need to set up the connection manually.
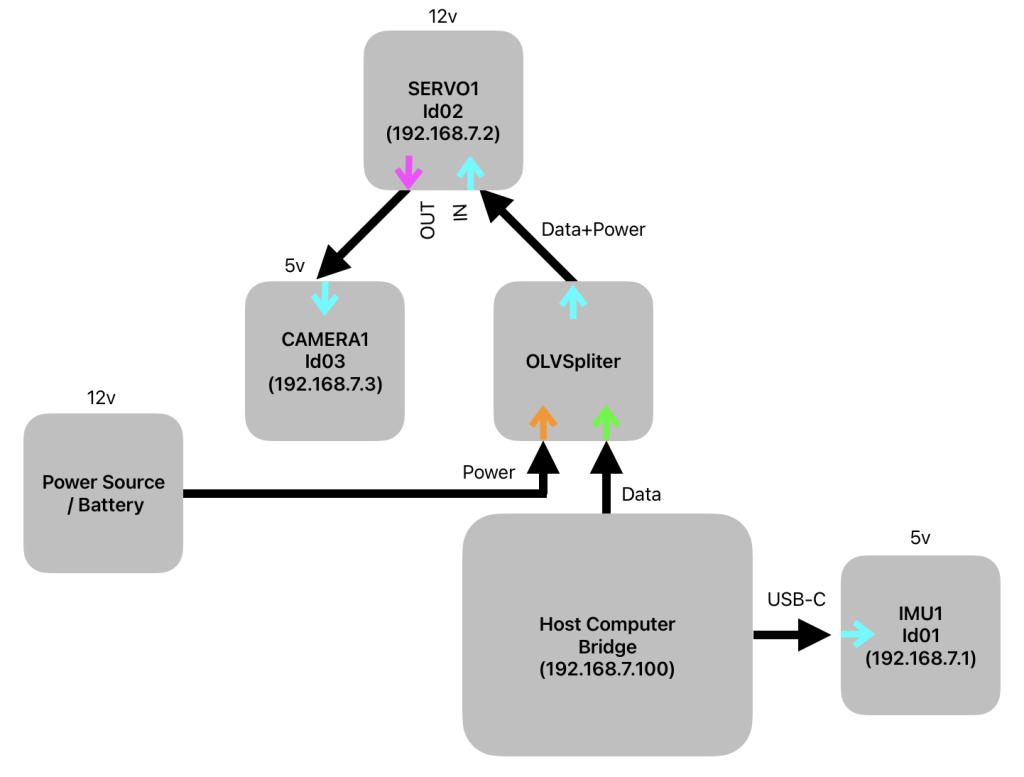
Alternatively, you can daisy-chain multiple servos, adding a camera or IMU at the end of the chain. In daisy chain mode, network bridging is handled automatically, requiring no additional configuration.
In summary, using the daisy chain method results in only one Ethernet device being visible in your network device list, but you can still access and ping all devices in the chain. Conversely, connecting multiple components without daisy-chaining will show multiple devices in your network list. This arrangement typically requires manual setup, involving the creation of a bridge network or the definition of static routes to integrate all Ethernet interfaces connected to Olive components. Follow the relevant procedures to establish this setup.
¶ Solution 1 (Static Routing)
if this is your example network setup:

[imu 1: 10.42.0.7] => [pc interface: 10.42.0.1]
[imu 2: 10.42.0.8] => [pc interface: 10.42.0.2]then on your main pc try:
sudo ip route add 10.42.0.7 via 10.42.0.1
sudo ip route add 10.42.0.8 via 10.42.0.2¶ Solution 2 (Network Bridge)
- Install the bridge-utils package:
sudo apt install bridge-utils
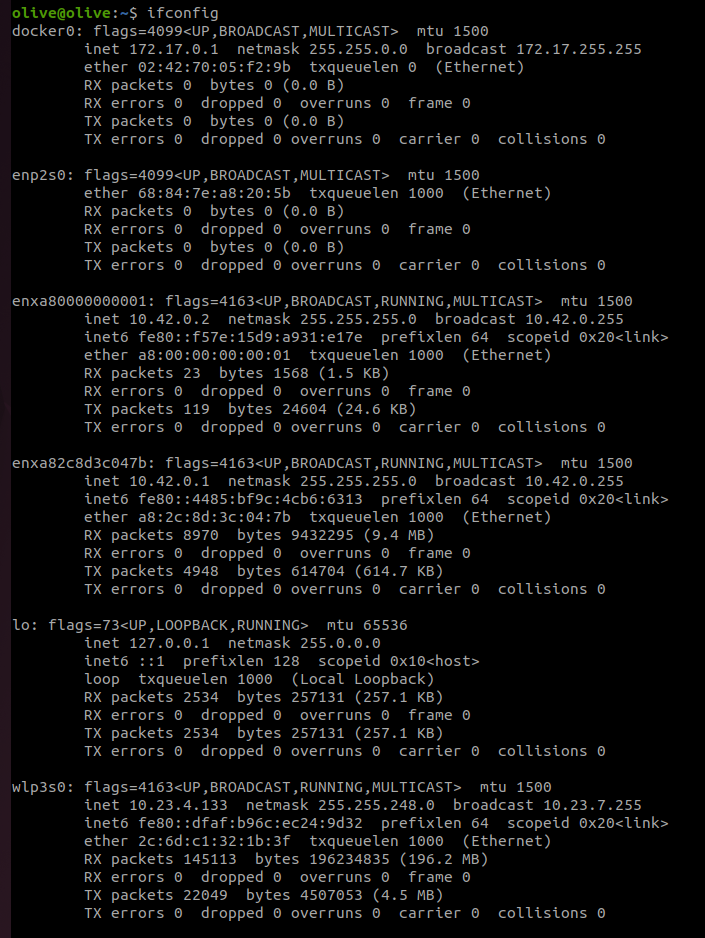
- First use the command "ifconfig" to see your current network interfaces:
ifconfigAs you can see in our example we have two Olive devices (enxa80000000001) and (enxa82c8d3c047b). We want to create a single bridge to internally connect this two interfaces and represents them with one ip address.
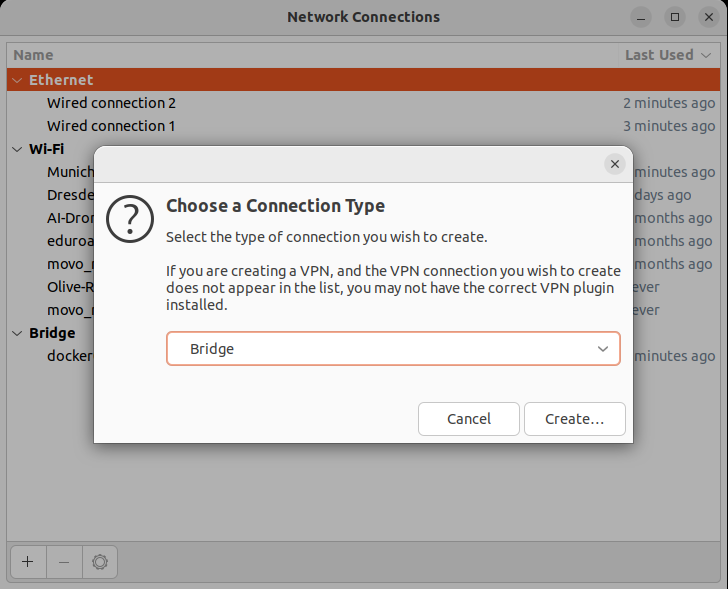
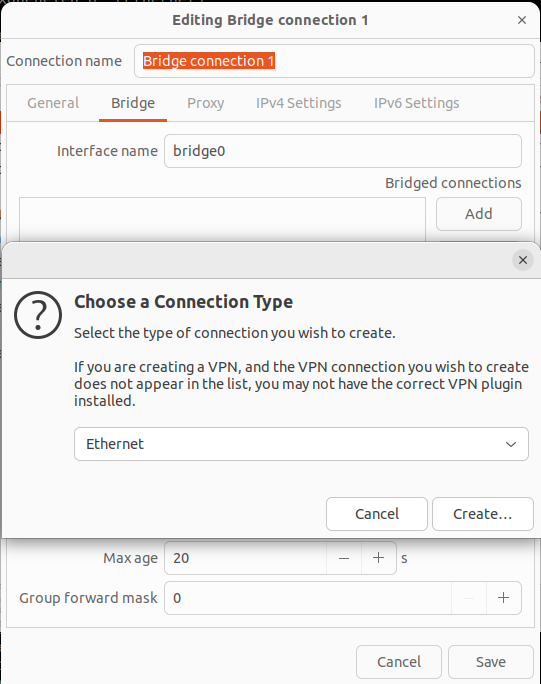
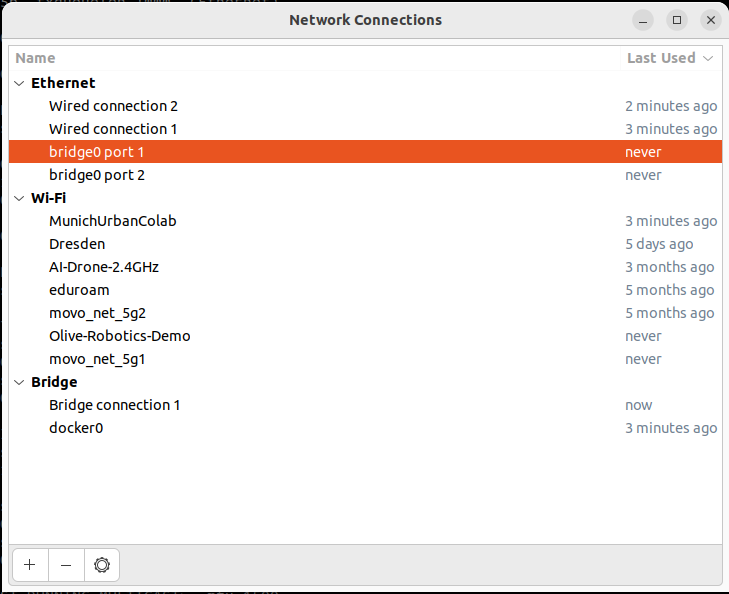
- Open the Network Manager connection editor GUI:
nm-connection-editor
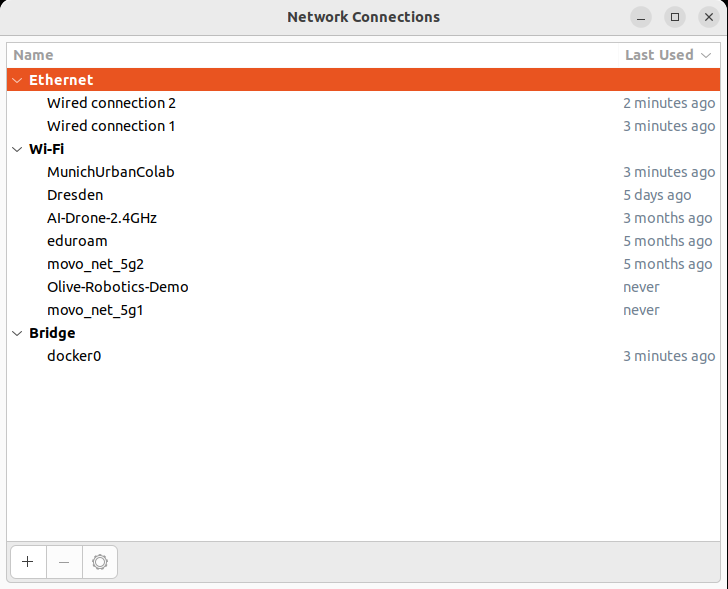
click on (+) and select "Bridge" from the list
- In the Bridge connection Editor add your Olive network interfaces. Each time select "Add" then select "Ethernet"
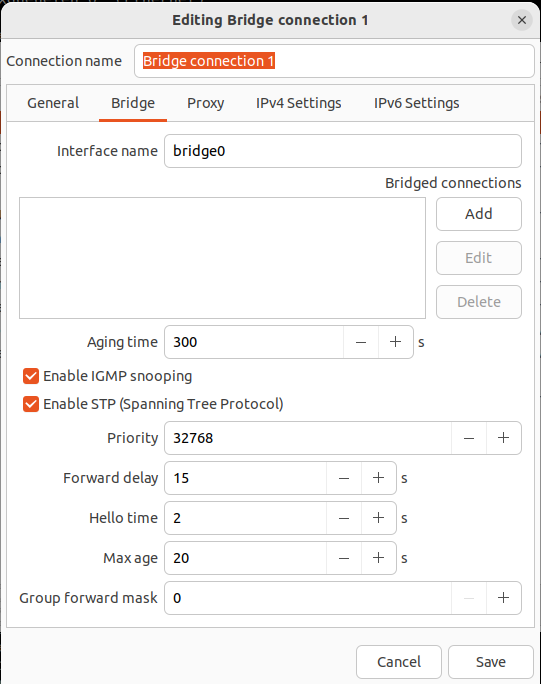
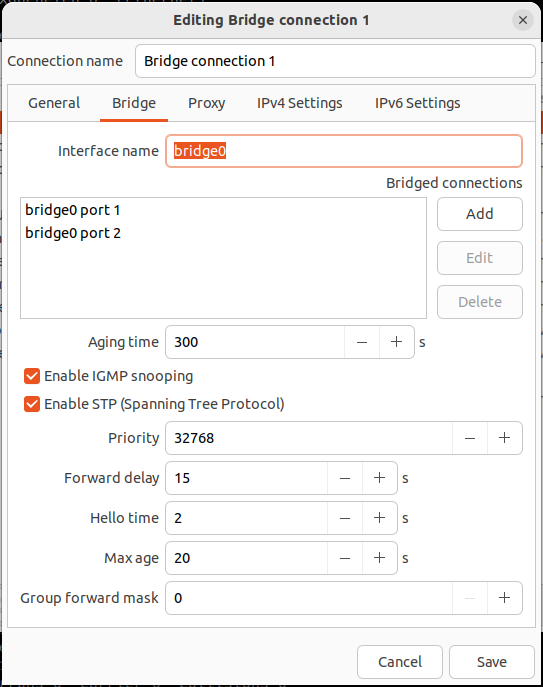
from the device list select the Olive devices by the interface name or the MAC address. Here (enxa80000000001) and (enxa82c8d3c047b).
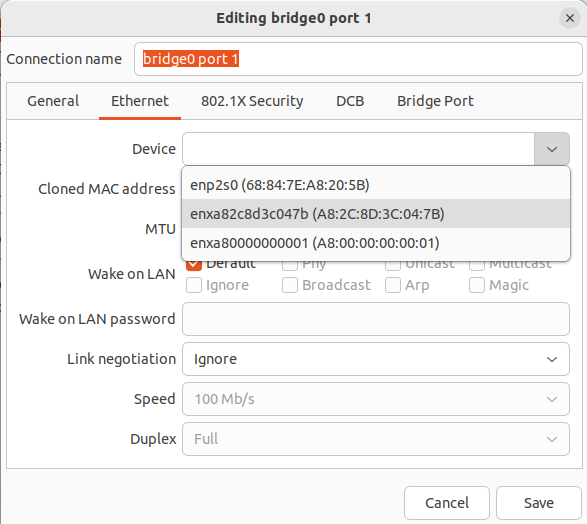
Once you done this step you will two interfaces in the list
- Change the Bridge ip to manual mode and define a static ip like:
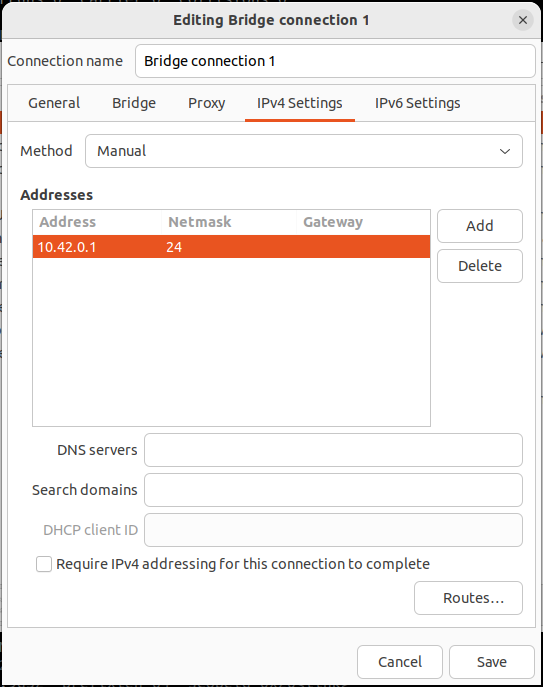
It is better to select "10.42.0.x" or better "10.42.0.1" as shown in the picture.
- Remove extra (old) network connections.
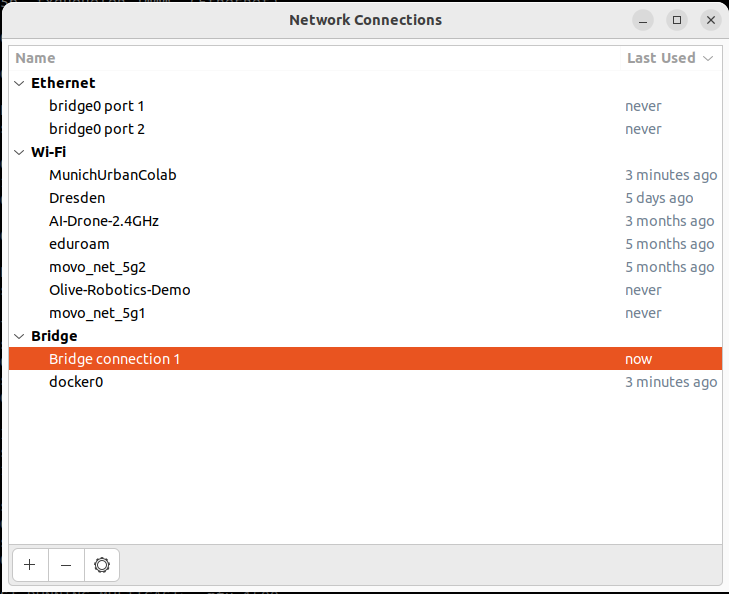
- Check the bridge connection:
sudo brctl showThis should display the bridge connection status between the Olive components.

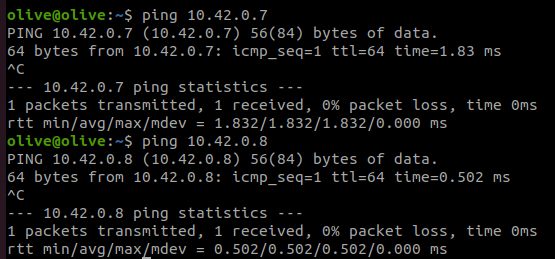
- Test the connection with the
pingcommand to ensure everything is correct. In this example, the first component has IP address10.42.0.7and the second has10.42.0.8.
¶ Behind NAT Network Configuration
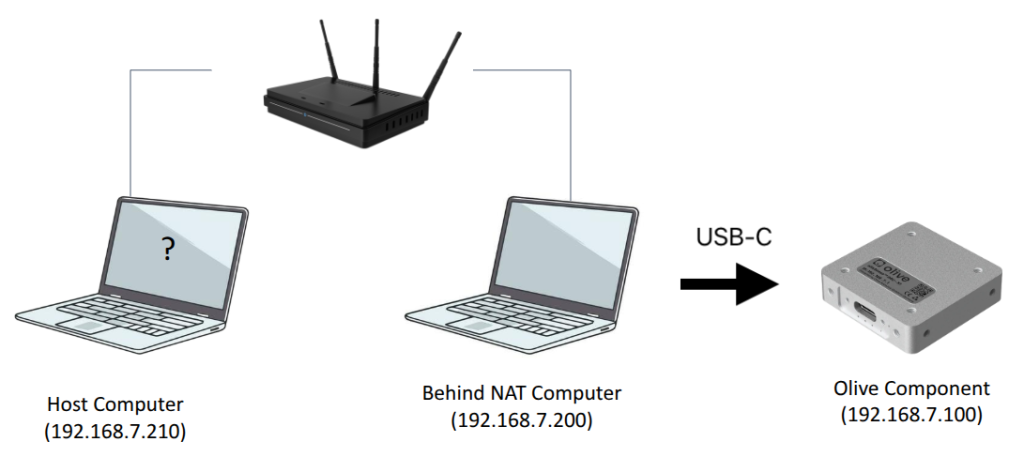
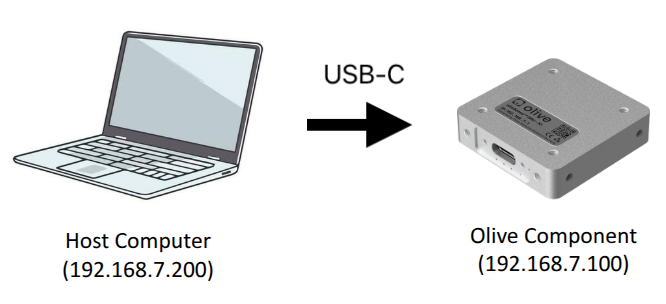
In the depicted network setup, the Olive Component (an IMU sensor with a ROS 2 native stack) is connected via USB-C to a Behind NAT Computer (192.168.7.200), and this system is able to communicate directly with the IMU at 192.168.7.100. However, the Host Computer (192.168.7.210) is only connected to the Behind NAT Computer via a shared local network and not directly to the USB-based network where the IMU resides. This creates a network segmentation issue, meaning the Host Computer cannot see the ROS 2 topics published by the IMU, such as /olive/imu/id001/ahrs, because the IMU exists on a virtual USB network interface that is isolated from the main LAN.
¶ The Problem
ROS 2 uses DDS (Data Distribution Service), which relies heavily on multicast and assumes nodes are on the same Layer 2 broadcast domain (i.e., same subnet). In this case, since the Host Computer and the IMU are on different interfaces and subnets, they cannot automatically discover each other or communicate directly.
¶ Solution 1: Use a ROS 2 Topic Re-publisher
A straightforward solution is to re-publish the IMU topic from the Behind NAT Computer (which has direct access to the sensor) so that it becomes visible and available on the Host Computer's network.
You can use the terminal or a ROS 2 launch file to republish the topic like this:
ros2 run topic_tools relay /olive/imu/id001/imu /imu_relayThen, on the Host Computer, you subscribe to the
relayed topic:
ros2 topic echo /imu_relayThis setup allows your Host Computer to receive IMU data indirectly, even though it cannot access the original topic directly due to network segmentation.
¶ Solution 2: (Advance)
You can turn the Behind NAT Computer into a gateway/router to allow the Host Computer to access devices (like your IMU) that are on a different subnet/interface — in this case, the USB-C virtual interface connected to enx0a569ff7a687.
¶ On Behind NAT Computer (192.168.7.200):
¶ Step 1: Enable IP Forwarding
sudo sysctl -w net.ipv4.ip_forward=1Make it permanent:
echo "net.ipv4.ip_forward = 1" | sudo tee -a /etc/sysctl.conf
sudo sysctl -p¶ Step 2: Set up NAT (MASQUERADE)
sudo iptables -t nat -A POSTROUTING -o enx0a569ff7a687 -j MASQUERADEThis makes it possible for the IMU to reply to packets that came from the Host via the NAT PC.
¶ On Host Computer (192.168.7.210):
¶ Step 3: Add Static Route to IMU through NAT
sudo ip route add 192.168.7.100 via 192.168.7.200 dev eth0This tells the Host Computer to send packets for the IMU via the NAT computer.
ros2 topic listYou should see all the topics now!
¶ Internet Sharing
¶ Windows
- First, open the Network Manager and identify your Olive network interface (in this case, "network 39"). Also, identify the interface through which you wish to share the internet (in this context, the WiFi).
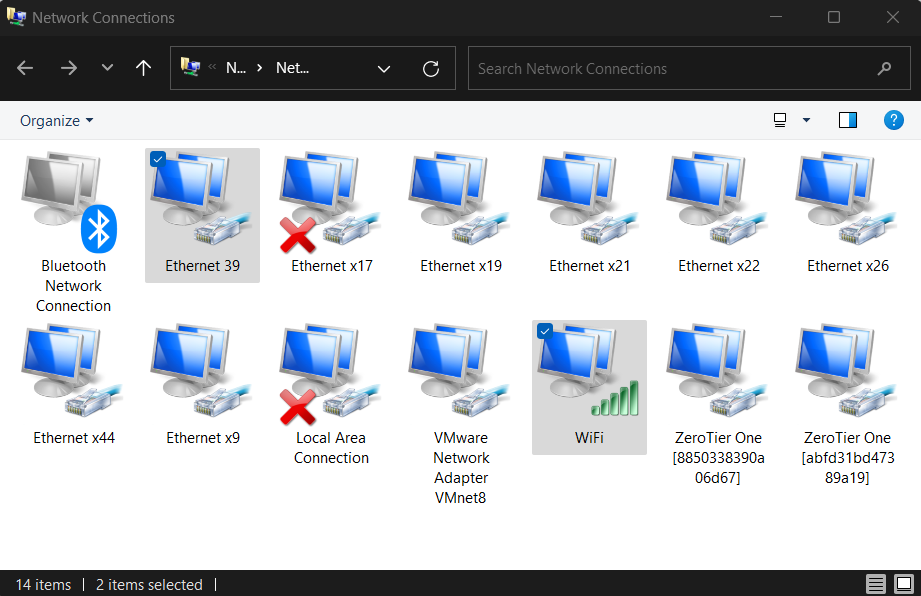
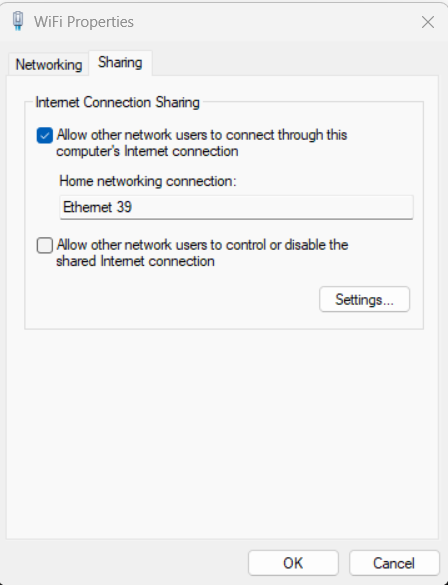
- Next, access the settings of the WiFi network. Navigate to the appropriate tab and select the "Internet Sharing" feature. From the dropdown list, choose the Olive interface (in this instance, "network 39").
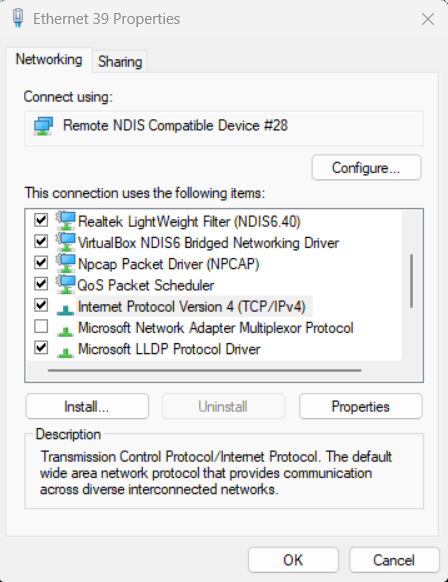
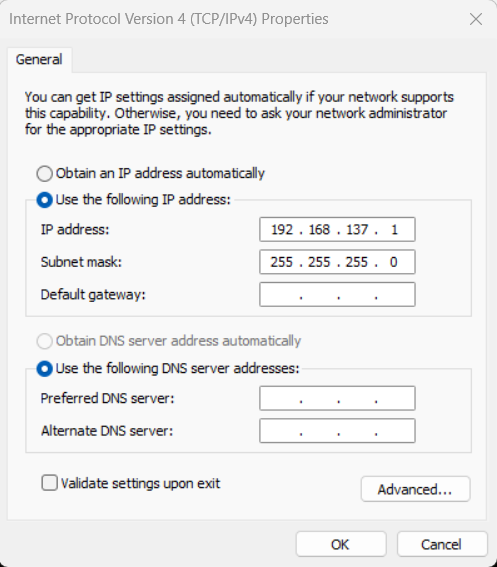
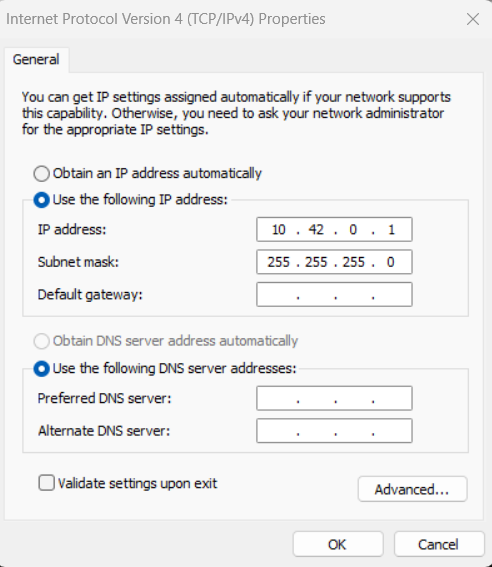
- Once again, open the network settings for the Olive interface. Proceed to the IPv4 configuration and modify the predefined IP to match the default gateway IP of the Olive interface. By default, the gateway value is set to 10.42.0.1.
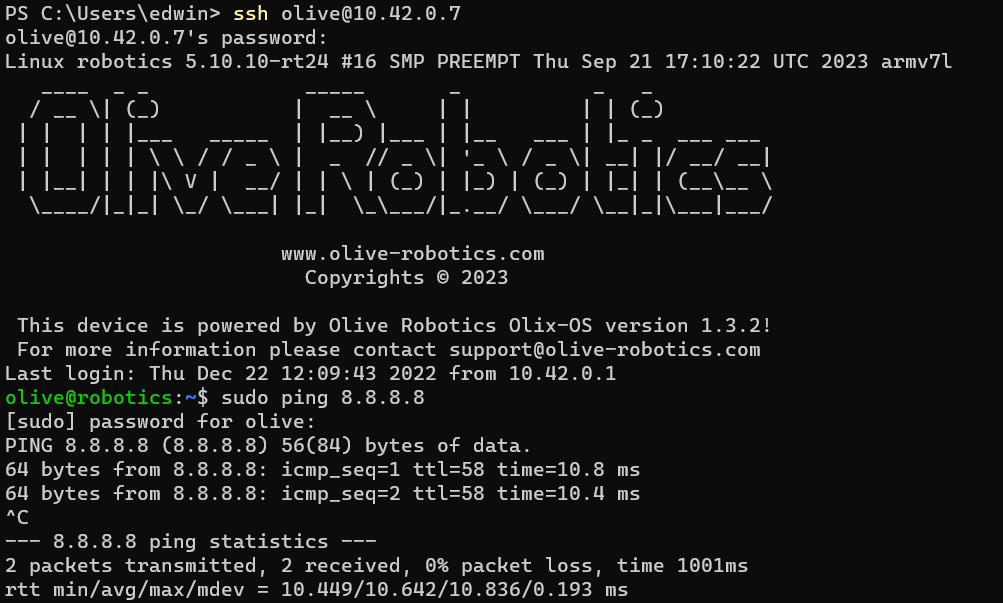
- Now, SSH into the Olive component and attempt to ping 8.8.8.8 to verify your internet connection. If successful, you should observe a successful ping response as shown below:
- If you wish to change the default gateway on the device, follow these commands on the Olive component:
sudo ip route del default #delete the default route
sudo ip route add default via 10.42.0.1 #add the default route¶ Linux Method 1 (Wi-Fi internet sharing)
- Install Necessary Packages: Before you begin, ensure you have the net-tools and dnsmasq packages installed. These tools will help manage and share the network.
sudo apt update
sudo apt install net-tools dnsmasq
- Use the following command to list your network interfaces:
ifconfig
- Use the commands below to share your Wi-Fi internet (here:
wlp3s0) with your Olive interface (here:enxa80000000001). Replace these two interface names based on your Wi-Fi and Olive interface names.
sudo sysctl -w net.ipv4.ip_forward=1
sudo iptables -t nat -A POSTROUTING -o wlp3s0 -j MASQUERADE
sudo iptables -A FORWARD -i enxa80000000001 -o wlp3s0 -j ACCEPT
sudo iptables -A FORWARD -i wlp3s0 -o enxa80000000001 -m state --state RELATED,ESTABLISHED -j ACCEPT

sudo apt-get install iptables-persistent
sudo sh -c "iptables-save > /etc/iptables/rules.v4"
- Verify Internet Sharing: SSH into the Olive component and try pinging an external server to check if the internet connection is shared:
sudo ping 8.8.8.8¶ Linux Method 2 (Lan internet sharing)
- Install Necessary Packages: Before you begin, ensure you have the net-tools and dnsmasq packages installed. These tools will help manage and share the network.
sudo apt update
sudo apt install net-tools dnsmasq
- Use the following command to list your network interfaces:
ifconfig
- Configure Network Manager:
- Open the Network Manager GUI.
- Identify your primary internet connection.
- Also, identify the Olive network interface you wish to share the internet with. - Set Up Internet Sharing:
- Go to the settings of your primary internet connection.
- Navigate to the "IPv4" tab.
- Choose the "Shared to other computers" option from the "Method" dropdown menu. - Restart Network Manager: After making the changes, restart the Network Manager to apply them:
sudo service network-manager restart
- Verify Internet Sharing: SSH into the Olive component and try pinging an external server to check if the internet connection is shared:
sudo ping 8.8.8.8
¶ SSH
¶ How to log in?
Logging in to a Linux real-time Olix-OS system using SSH (Secure Shell) is a common method for remotely accessing and managing the system. SSH is a secure protocol that allows you to remotely access the command line of a Linux system over a network connection.
To log in to a Linux real-time Olix-OS system using SSH, you will need a computer or device with an SSH client installed, and the IP address or hostname of the Olix-OS system.
The first step is to open the terminal or command prompt on your computer and type the command ssh olive@<IP_address> or ssh olive@<hostname> and press enter. This will initiate an SSH connection to the Olix-OS system.
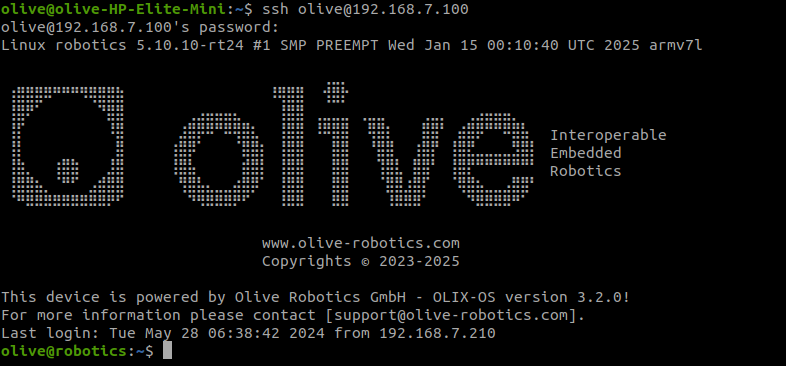
Once the connection is established, you will be prompted for the password for the user account olive. You will need to enter the password one and press enter.
After providing the correct credentials, you will be logged in to the Olix-OS system and will have access to the command line interface. You can then issue commands to the Olix-OS system and perform various tasks such as configuring the system, managing files and processes, and monitoring system performance.
It's also important to note that SSH uses encryption to secure the communication between the client and the server, which means that your login credentials and data transmitted during the session will be protected against eavesdropping.
It's also important to mention that, depending on the real-time Olix-OS Linux distribution, the SSH daemon might not be enabled by default. It's recommended to check the system configuration and the usage of ssh service on the Olix-OS Linux before trying to connect to the system.
¶ Time Synchronization
¶ Precision Time Protocol (PTP)
Due to limitations in the USB protocol, achieving PTP synchronization is not feasible with our current USB version of the products. PTP is supported in our Ethernet-based components with the code name ‘Ultra’.
Please install linuxptp (> version 3.1.1) or any other standard PTP software used in your robotic system or IT infrastructure.
Then run a service to expose the PTP master in your host computer. You can find the example systemd service to run in your host linux:
First check and make sure your ethernet supports hardware PTP:
Check this on your master computer:
ethtool -T eth0
$ ethtool -T eno1
Time stamping parameters for eno1:
Capabilities:
	hardware-transmit
	software-transmit
	hardware-receive
	software-receive
	software-system-clock
	hardware-raw-clock
PTP Hardware Clock: 0
Hardware Transmit Timestamp Modes:
	off
	on
Hardware Receive Filter Modes:
	none
	all
	ptpv1-l4-sync
	ptpv1-l4-delay-req
	ptpv2-l4-sync
	ptpv2-l4-delay-req
	ptpv2-l2-sync
	ptpv2-l2-delay-req
	ptpv2-event
	ptpv2-sync
ptpv2-delay-req¶ Install LinuxPTP on Master
sudo apt install linuxptp
[Unit]
Description=Olive Robotics PTP Master Example
After=network.target

[Service]
Type=simple
User=root
ExecStart=ptp4l -i eno1 -m -H -f /etc/linuxptp/master.cfg

[Install]
WantedBy=multi-user.targetExample Command for :
sudo ptp4l -i eno1 -m -H -f /etc/linuxptp/master.cfg
tp4l[3352098.152]: selected /dev/ptp0 as PTP clock
ptp4l[3352098.152]: port 1: INITIALIZING to LISTENING on INIT_COMPLETE
ptp4l[3352098.153]: port 0: INITIALIZING to LISTENING on INIT_COMPLETE
ptp4l[3352105.022]: port 1: LISTENING to MASTER on ANNOUNCE_RECEIPT_TIMEOUT_EXPIRES
ptp4l[3352105.022]: selected local clock 30138b.fffe.805c75 as best master
ptp4l[3352105.022]: port 1: assuming the grand master roleExample Configuration for Hardware PTP with PTP Time Scale active:
[global]
time_stamping         hardware
network_transport     UDPv4
delay_mechanism       E2E

priority1             1
priority2             1

clockClass            6
clockAccuracy         0x20
offsetScaledLogVariance 0x2

timeSource            0x20

# CRITICAL
utc_offset            37
You can check if the PTP Timescale is active with:
$ sudo pmc -u -b 0 "GET GRANDMASTER_SETTINGS_NP"
sending: GET GRANDMASTER_SETTINGS_NP
	30138b.fffe.805c75-0 seq 0 RESPONSE MANAGEMENT GRANDMASTER_SETTINGS_NP
		clockClass              6
		clockAccuracy           0x20
		offsetScaledLogVariance 0x0002
		currentUtcOffset        37
		leap61                  0
		leap59                  0
		currentUtcOffsetValid   0
		ptpTimescale            1
		timeTraceable           0
		frequencyTraceable      0
		timeSource              0x20
With this we can make sure your Master is ready and in hardware mode and can be used correctly with Olive ethernet components.
¶ Activate PTP mode on Olive component
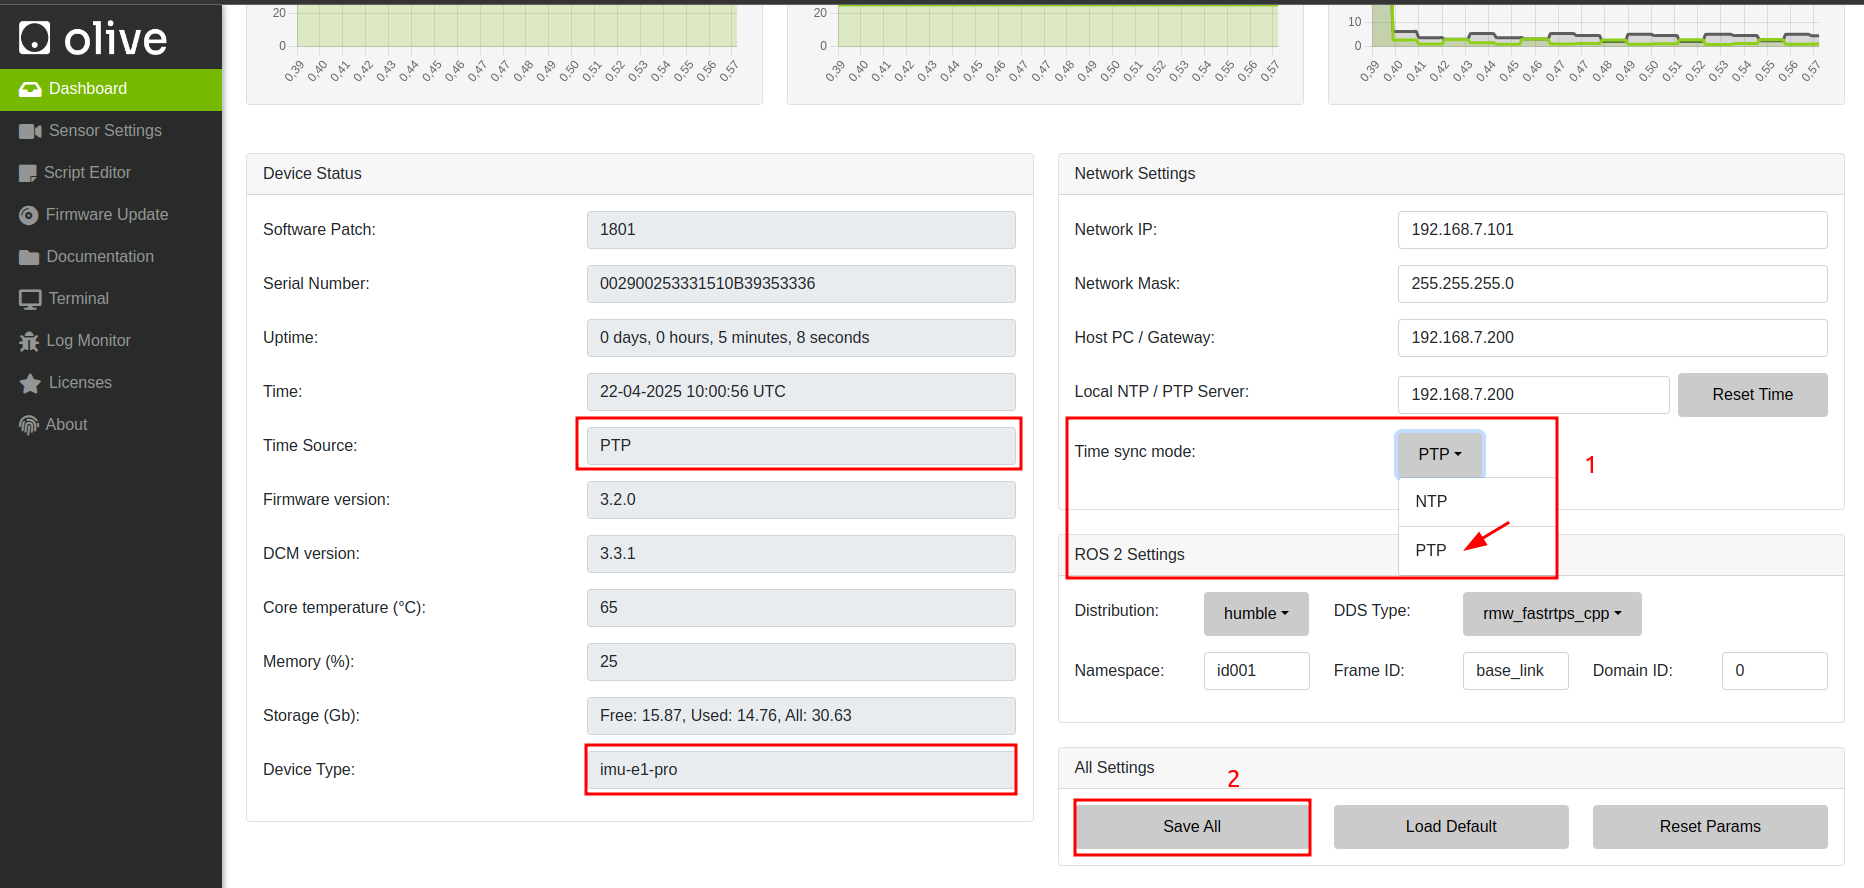
In Ethernet version of Olive Components the Time source option will be available in GUI which you can change NTP to PTP.
SSH to the Olive component and verify PTP accuracy with:
olive@robotics:/opt/olive/bin/linuxptp-4.2$ sudo systemctl status olive-ptp.service
● olive-ptp.service - Olive Robotics PTP initialization
     Loaded: loaded (/etc/systemd/system/olive-ptp.service; disabled; vendor preset: enabled)
     Active: active (running) since Mon 2024-05-27 13:02:26 UTC; 1 years 9 months ago
   Main PID: 896 (ptp4l)
     Memory: 380.0K
        CPU: 3min 47.301s
     CGroup: /system.slice/olive-ptp.service
             └─896 /opt/olive/bin/linuxptp-4.2/ptp4l -i eth0 -s -m -S

Mar 21 12:54:46 robotics ptp4l[896]: ptp4l[72120.344]: master offset     147024 s2 freq  +26969 path delay    136368
Mar 21 12:54:46 robotics ptp4l[896]: [72120.344] master offset     147024 s2 freq  +26969 path delay    136368
Mar 21 12:54:47 robotics ptp4l[896]: ptp4l[72121.330]: master offset     242451 s2 freq  +36755 path delay    136368
Mar 21 12:54:47 robotics ptp4l[896]: [72121.330] master offset     242451 s2 freq  +36755 path delay    136368
Mar 21 12:54:48 robotics ptp4l[896]: ptp4l[72122.320]: master offset     -71269 s2 freq   +5311 path delay    136819
Mar 21 12:54:48 robotics ptp4l[896]: [72122.320] master offset     -71269 s2 freq   +5311 path delay    136819
Mar 21 12:54:49 robotics ptp4l[896]: ptp4l[72123.330]: master offset    -166914 s2 freq   -4420 path delay    122759
Mar 21 12:54:49 robotics ptp4l[896]: [72123.330] master offset    -166914 s2 freq   -4420 path delay    122759
Mar 21 12:54:50 robotics ptp4l[896]: ptp4l[72124.326]: master offset      -1437 s2 freq  +12126 path delay    112772
Mar 21 12:54:50 robotics ptp4l[896]: [72124.326] master offset      -1437 s2 freq  +12126 path delay    112772
olive@robotics:/opt/olive/bin/linuxptp-4.2$ | Sample | Offset (ns) | Offset (µs) |
|---|---|---|
| 1 | -123334 | -123.334 µs |
| 2 | 61056 | 61.056 µs |
| 3 | -59849 | -59.849 µs |
| 4 | 68851 | 68.851 µs |
| 5 | -11927 | -11.927 µs |
Congratulations, you have achieved up to 10 microseconds accuracy.
Olive components use software PTP. We are also working on enabling hardware PTP. In practice, software PTP in hybrid mode (with a hardware PTP master) currently provides the best performance and stability. For best results, connect the Olive sensor directly to the master with minimal third-party switches or routers.
¶ Network Time Protocol (NTP)
The Network Time Protocol (NTP) is a widely used protocol designed to synchronize the clocks of computers and devices over a network to a precise time reference. It ensures that all systems within a distributed infrastructure maintain accurate and consistent timekeeping, which is essential for time-sensitive operations, logging, event coordination, and security protocols. NTP typically operates in a client-server model, where clients adjust their clocks based on timestamps received from one or more servers. These servers can, in turn, synchronize with even more accurate sources, such as GPS or atomic clocks. NTP can compensate for variable network delays and is capable of maintaining time accuracy within milliseconds over the internet, and even better performance on local area networks.
¶ Setting Up NTP Synchronization on Olive Components
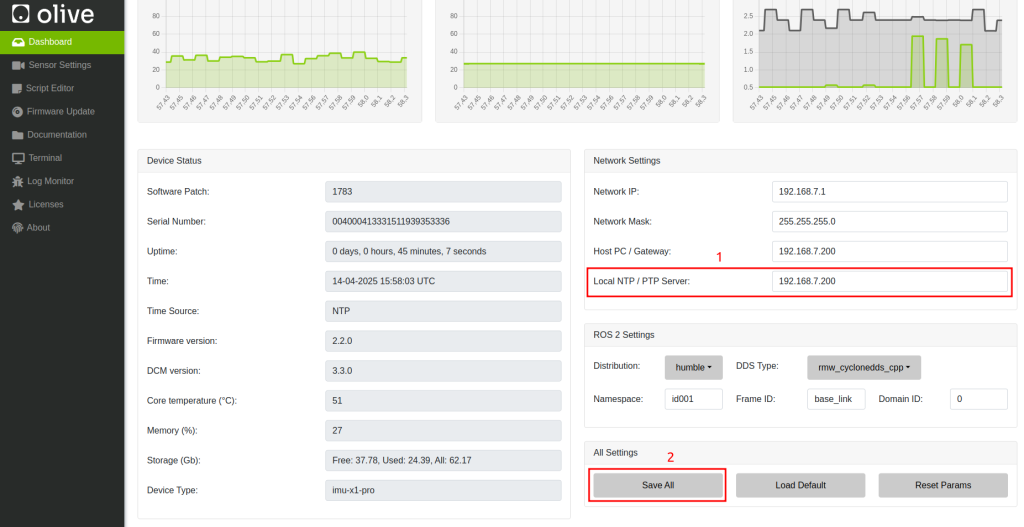
Adding NTP Server IP:
- Access the GUI: Log into your Olive component's GUI.
- Configure NTP Settings: Find the network or time settings and enter the IP of your NTP server.
- Save and Reboot: Apply changes and reboot the component.
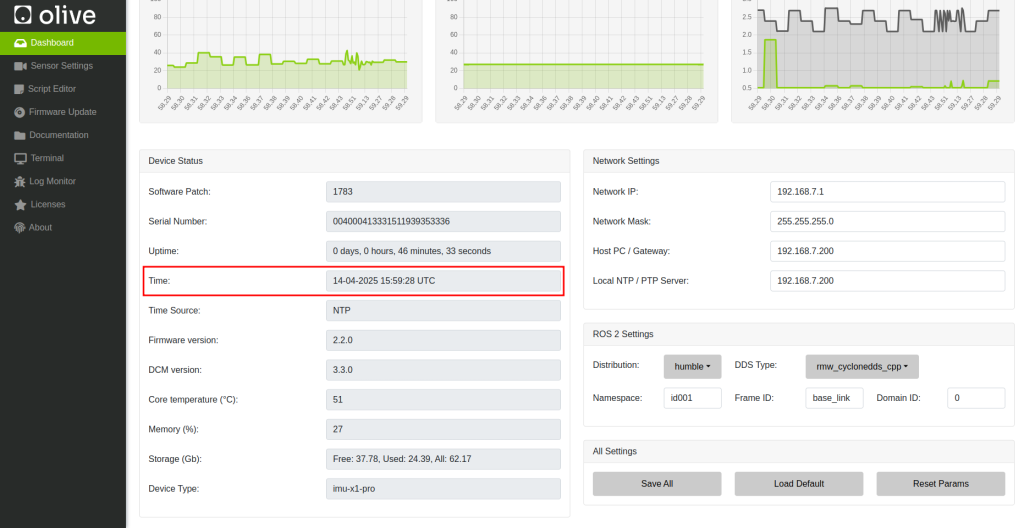
- Verify Time: Open the Olive GUI and check the time status
- Deep Verify (ssh in to Olive):
olive@robotics:~$ ntpq -p
     remote           refid      st t when poll reach   delay   offset  jitter
==============================================================================
*192.168.7.200 79.133.44.139 2 u 28 128 377 0.234 -1.082 0.266¶ Installing an NTP Server on Your Host Computer
For Linux:
- Install NTP: Run
sudo apt-get update && sudo apt-get install ntp. - Edit Config: Modify
/etc/ntp.confto add public NTP server entries.- Example Config for the host computer:
server 0.pool.ntp.org iburst
server 1.pool.ntp.org iburst

restrict 192.168.7.0 mask 255.255.255.0 nomodify notrap

# Local fallback (important!)
server 127.127.1.0
fudge 127.127.1.0 stratum 10
- Restart NTP: Execute
sudo systemctl restart ntp.
For Windows:
- Enable NTP Server: Go to
Internet Timesettings in the Control Panel, set up synchronization with a server from pool.ntp.org, and clickUpdate now.
Note: Ensure UDP port 123 is open in your firewall for NTP traffic.
That's it! Your Olive system should now be synchronizing its time with the predefined NTP server.
¶ Reset Factory
To perform a factory reset on your Olive device, press and hold the reset button for more than 10 seconds. During this time, the LEDs will start blinking between 6 to 10 seconds as a warning. If you continue holding the button, the LEDs will turn solid, indicating the initiation of the factory reset process. This will restore the device to its default settings, create a reset trigger, roll back to a stable software update, and then reboot the device.
This factory reset step will only reset the device’s IP address to its default.

DANGER
Please note that the factory reset will take up to 2 minutes, and the device will reboot several times. During this period, please do not remove the connection cable.
For a safe shutdown without a factory reset, hold the button for 2 to 6 seconds.
¶ Olive Component Reset Instructions Summary
| Duration | Action | LED Indicator | Expected Outcome |
|---|---|---|---|
| Less than 2 sec | No Action | On (Off on release) | No action taken |
| 2 to 6 sec | System Shutdown | On (Off on release) | System shuts down safely |
| 6 to 10 sec | Warning for Reset | Blinking | LED blinks as a warning before factory reset |
| More than 10 sec | Factory Reset Initiated | Solid On then Off | Factory reset starts: reset trigger created, rollback to default IP, and twice reboot |
¶ Reset Factory Procedure Demonstrations
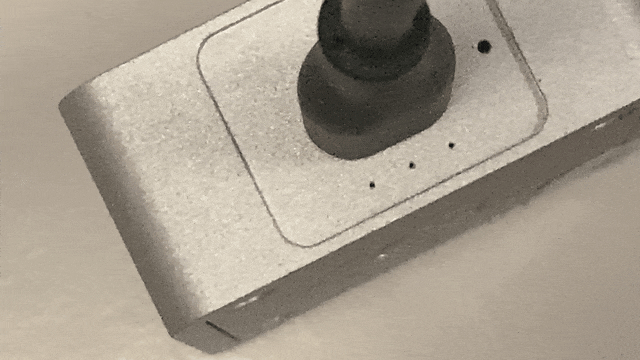
¶ General Example (IMU-U01X09D-Gen1)
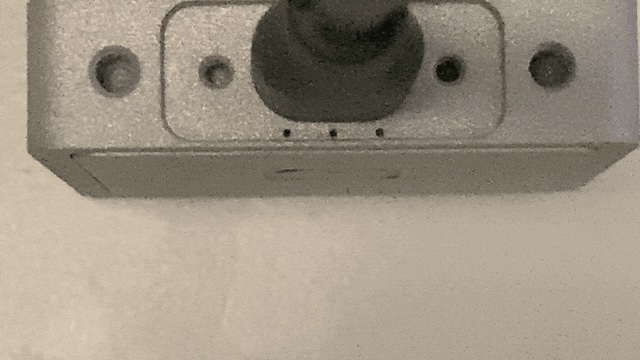
¶ General Example (IMU-U01X09D-Gen2)
¶ Examples / Apps
For open-source apps and examples, please visit our GitHub page, where you will find a comprehensive collection of Python and C++ projects specifically tailored for Olive Robotics components. These resources are designed to help you learn how to integrate your software, write custom apps, and develop unique solutions for Olive devices.
Our GitHub playground repositories showcase a variety of practical examples, demonstrating how to effectively utilize Olive Robotics components to create innovative applications. As you explore these repositories, you'll gain valuable insights into the capabilities of our products and acquire the skills needed to build your own custom apps and codes for Olive devices.
Additionally, our thriving GitHub community promotes collaboration and knowledge-sharing. We encourage you to contribute to the repositories, engage in discussions, and interact with other developers who are also working with Olive Robotics components. Together, we can foster an ecosystem that drives innovation and empowers programmers to create cutting-edge solutions.
For more information please visit our github page:
https://github.com/olive-robotics
¶ IMU Examples:
https://github.com/olive-robotics/olvx_playground_imu
¶ Camera Examples:
https://github.com/olive-robotics/olvx_playground_camera


¶ Servo Examples:
https://github.com/olive-robotics/bots_bento_icra24
https://github.com/olive-robotics/olvx_playground_servo
¶ Web-based GUI
The Olive Embedded Web-based GUI is a user-friendly interface for configuring, controlling, and testing out our modular robotic building blocks. It provides a wide range of capabilities for setting up and controlling our hardware components, including setting parameters, sending commands, and visualizing sensor data.
To open the web GUI, type the component's IP address in your browser and press Enter. Unless you changed the module IP, the default value is 192.168.7.100. This works only when the component is connected to your host PC and its network interface is recognized.
The Embedded Web-based GUI is a web service that runs directly on the module, and it connects to your computer over a standard Ethernet connection. This means that you can access and control our hardware components from any web browser, on any device, without having to install any additional software.
The Embedded Web-based GUI is an essential tool for learning about our hardware and for debugging during development. It provides a visual and intuitive way to interact with our hardware components, and it makes it easy to experiment with different settings and configurations.
The GUI provides a visual and intuitive way to interact with the hardware components and visualize sensor data, making it easy to experiment with different settings and configurations.
In conclusion, the Olive Embedded Web-based GUI is an essential part of the Olive Robotics product offering and is an invaluable resource for anyone using the company's hardware to build and program their own robotic systems.
¶ Dashboard
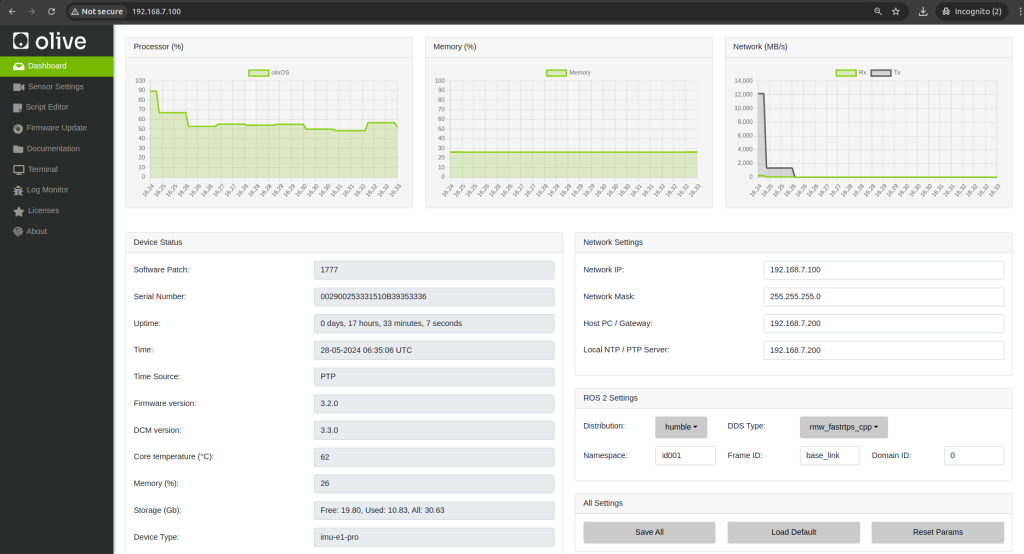
The Olive GUI dashboard is the main page of the web-based interface that allows users to interact with Olive Robotics modular components. The dashboard provides a comprehensive overview of the module's primary information and allows users to change basic settings such as IP address, device name, and topic name. To do this, simply change the values and click "Save".
The dashboard also displays real-time system status information, such as temperature, uptime, process, and network usage. This allows users to quickly and easily monitor the status of the device, including any potential issues or errors. The dashboard also provides easy access to other pages on the interface, allowing users to configure, control and test different aspects of the device.
In summary, the Olive GUI dashboard is the primary interface that allows users to interact with the Olive Robotics modular robotic building blocks. It provides a comprehensive overview of the device and allows users to easily change basic settings and monitor the real-time system status. It's a simple yet powerful tool to manage the device and that allow to access other features easily.
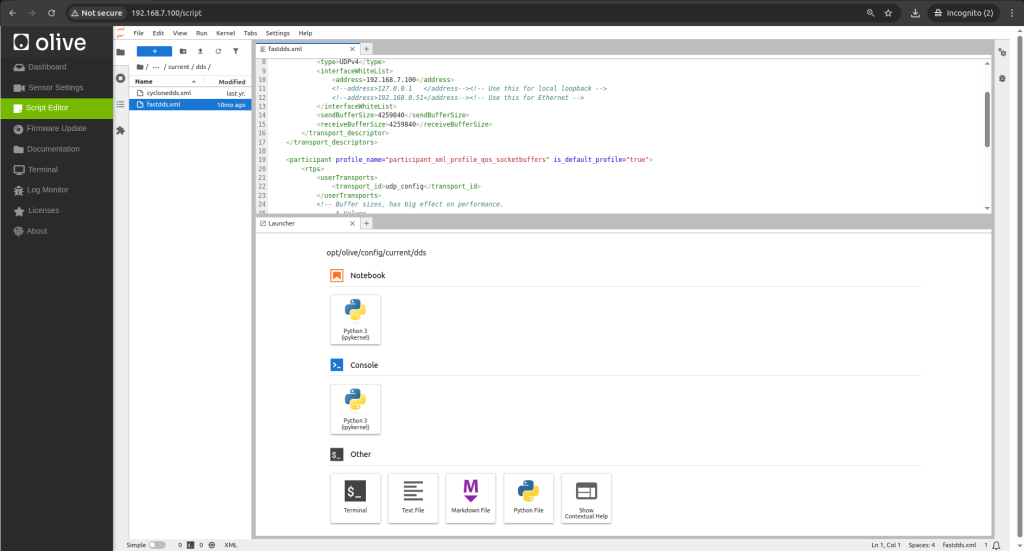
¶ Embedded IDE
The Olive Embedded IDE is an Integrated Development Environment (IDE) that is based on the JupyterLab platform. It allows users to manage embedded files on the device, create projects, write Python or C++ based embedded applications, and run them on the modules.
The web-based nature of the IDE means that it can be accessed from any device, without the need to install additional software. This allows users to easily manage and customize the device, whether they are on-site or remotely. The IDE provides a simple and intuitive interface for creating and running code on the device, which makes it a great tool for both novice and advanced users.
The IDE's support for multiple programming languages, including Python and C++, allows for a high degree of flexibility and customization. This is especially useful for advanced users who want to highly customize their modules on-the-go.
Overall, the Olive Embedded IDE is a powerful tool that allows users to manage, customize and program the Olive Robotics' modular robotic building blocks. The Jupyter lab based interface and support for multiple programming languages makes it easy for users to create and run their own embedded applications on the device, whether they are novice or advanced users.
Learn more here https://jupyter.org/hub.
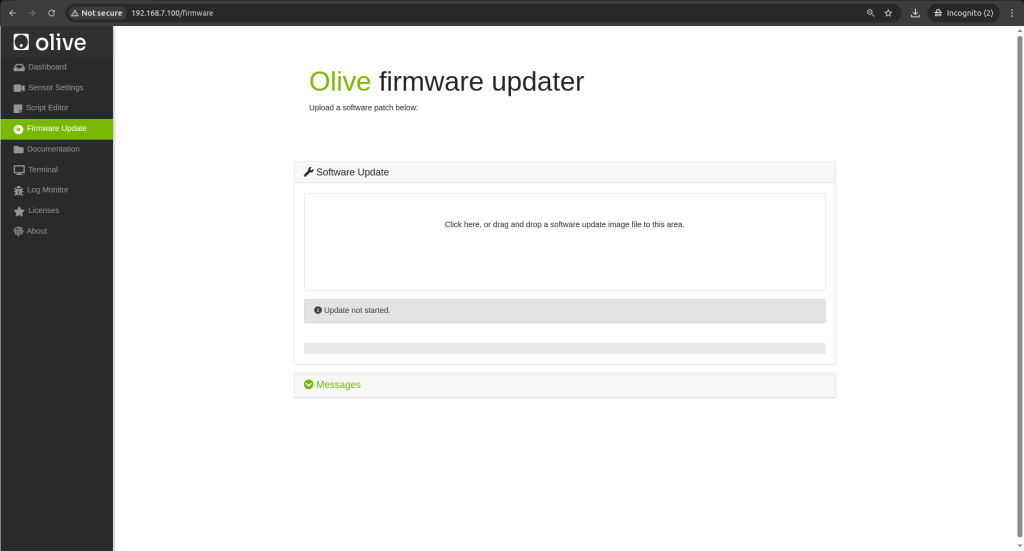
¶ Patch Update
The firmware update tab is a feature of the Olive GUI that allows users to patch the firmware of the device Over-the-Air (OTA). This tab allows users to load new kernels, applications, settings, and other updates to the device simply.
The OTA firmware patch feature is useful when users have multiple devices in remote locations or when it's difficult or impossible to connect the device to a computer to update it. It also allows to have a central way to update multiple devices at once and ensure that all of them have the same software version.
Using this tab, users can easily check for available updates, download and install them on the device. The firmware update tab will typically provide information on the current firmware version and version history, as well as instructions for performing the update.
Overall, the firmware update tab is an important feature of the Olive GUI that allows users to easily update the device's firmware over-the-air, without the need for a hardware changes. This makes it an efficient and convenient way to keep the device's software up-to-date and ensure that it is running at its best performance.
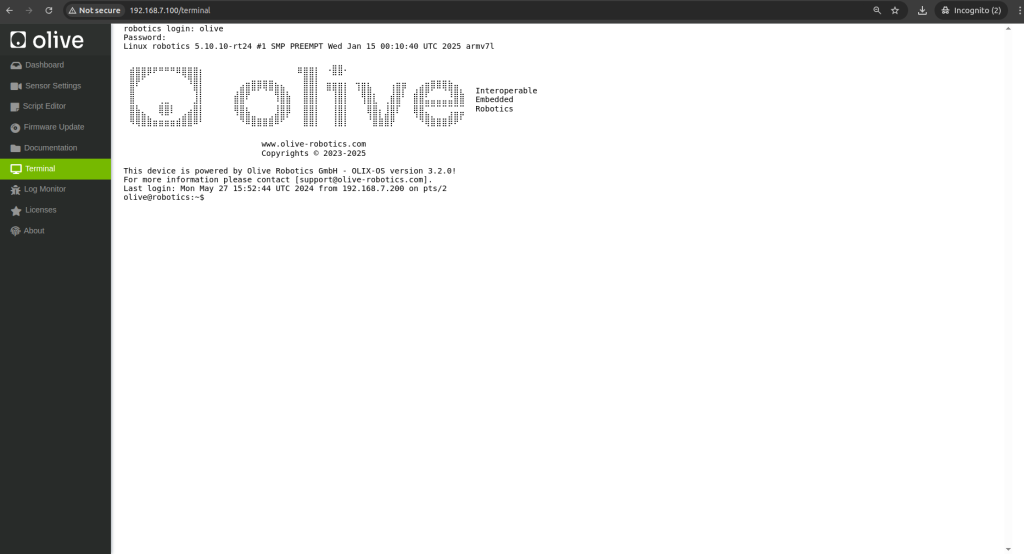
¶ Embedded Bash Terminal
The Embedded Bash Terminal is a feature of the Olive GUI that provides users with access to the shell of the real-time Linux system running on the device. The terminal allows users to interact with the device and its file system, giving them full operational control. It provides an interface to run command-line utilities, scripts, and other Linux commands on the device.
It's good to note that each module is running a real-time Linux kernel, named Olix-OS. which is a custom version of Linux tailored for the specific hardware, and this kernel allows the module to interact with other components and ensure that processes run smoothly.
The embedded Bash Terminal is particularly useful for advanced users who want to perform low-level operations on the device, such as configuring system settings, running scripts, or troubleshooting issues. It is also useful for developers who want to test scripts or command-line utilities before deployment.
Overall, the embedded Bash Terminal is a powerful feature of the Olive GUI that allows users to have full access to the device's shell and interact with the real-time Linux kernel running on it, giving them full control over the device's operation. This feature is particularly useful for advanced users and developers who want to perform low-level operations on the device.
¶ Onboard Logging
The onboard logging tab is a feature of the Olive GUI that allows users to view and manage the system logs of the device. System logs are a record of events that occur on the device, including system start and stop, error messages, and other system-level activity. These logs can be useful for troubleshooting and debugging issues that may occur on the device.

The onboard logging tab allows users to view the system logs in real-time, which can be helpful for identifying and resolving issues as they happen. It also allows users to search, filter and download the logs for offline analysis. Additionally, it gives the option to set the log's level of verbosity and the log's file size, which is useful for controlling the amount of data that is stored on the device.
In summary, the onboard logging tab is a feature of the Olive GUI that allows users to view and manage the system logs of the device. It allows users to view the logs in real-time, search, filter and download the logs, and set the log's level of verbosity and file size. This feature can be particularly useful for troubleshooting and debugging issues that may occur on the device.
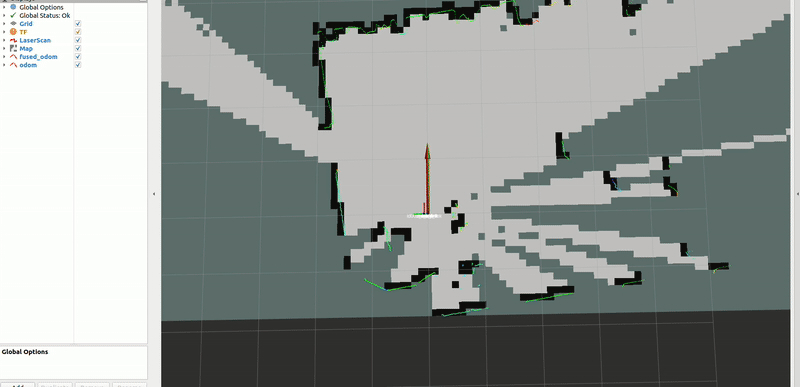
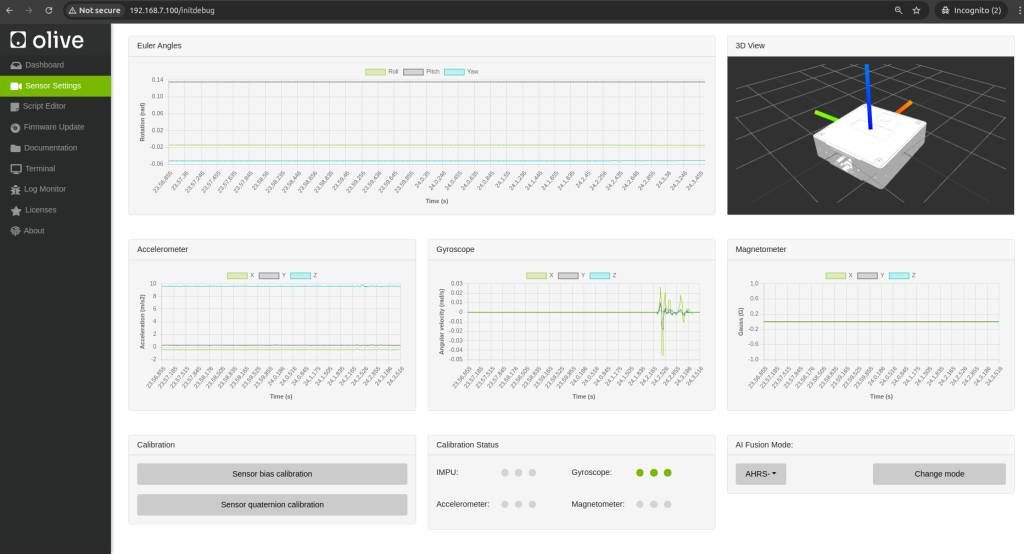
¶ Debug Interface
The debug interface is a tab that is part of the Olive GUI, It allows users to view real-time sensor data, which can help ensure that the sensors are functional and running properly. The real-time sensor data can be useful for troubleshooting and debugging any issues that may arise during the use of the device.
This tab can be particularly useful for developers who are creating new applications and want to check if the sensor is working correctly, or for users who want to verify that the sensor is providing accurate data. The tab allows to visualize the sensor data in numerical, graphic or other formats and compare it with other sensor's data or saved data, to make sure that sensor is working in the expected range.
In summary, the debug interface is an important feature of the Olive GUI that allows users to view real-time sensor data and ensure that the sensors are functional and providing accurate data. This tab allows users to verify sensor functionality and troubleshoot issues, making it an invaluable resource for anyone working with the Olive Robotics' modular robotic building blocks.
¶ olixOS
olixOS is a version of the Linux operating system that is optimized for use on embedded systems, which are small, resource-constrained devices that are used in a wide range of applications such as industrial automation, consumer electronics, and the Internet of Things (IoT).
Olix-OS Linux is typically built using a small subset of the Linux kernel and a minimal set of user-space utilities and libraries. This allows it to run on devices with limited memory and processing power, and it also reduces the size of the operating system, making it more suitable for embedded systems.
Olix-OS Linux is also highly configurable, which allows developers to fine-tune the operating system to meet the specific requirements of the embedded system. This includes configuring the kernel and user-space libraries, optimizing the system for performance, and selecting the appropriate drivers and software components.
Overall, embedded Linux is a versatile and powerful operating system that is well-suited for use on embedded systems. It provides a small footprint and configurability, as well as a large library of pre-built software, making it a popular choice for developers and manufacturers alike.

¶ Autorun your custom application
If you would like to enable autorun behavior for your custom application within the Olive components, you can add the executable command at the end of the app loader script. You can extend the script and add your logic to it.
/usr/bin/olive-app-loader.sh¶ Restarting Services
After ssh in your component, you can start, stop or restart olive dcm services by using this commands.
for eio:
sudo systemctl restart olive-dcm-eio.servicefor camera:
sudo systemctl restart olive-dcm-camera.servicefor imu:
sudo systemctl restart olive-dcm-imu.servicefor servo:
sudo systemctl restart olive-dcm-servo.servicefor system:
sudo systemctl restart olive-dcm-system.servicefor manager:
sudo systemctl restart olive-sys-manager.servicefor app loader:
sudo systemctl restart olive-app-loader.service
¶ Configs
¶ Olive config files are located at:
/opt/olive/config/current
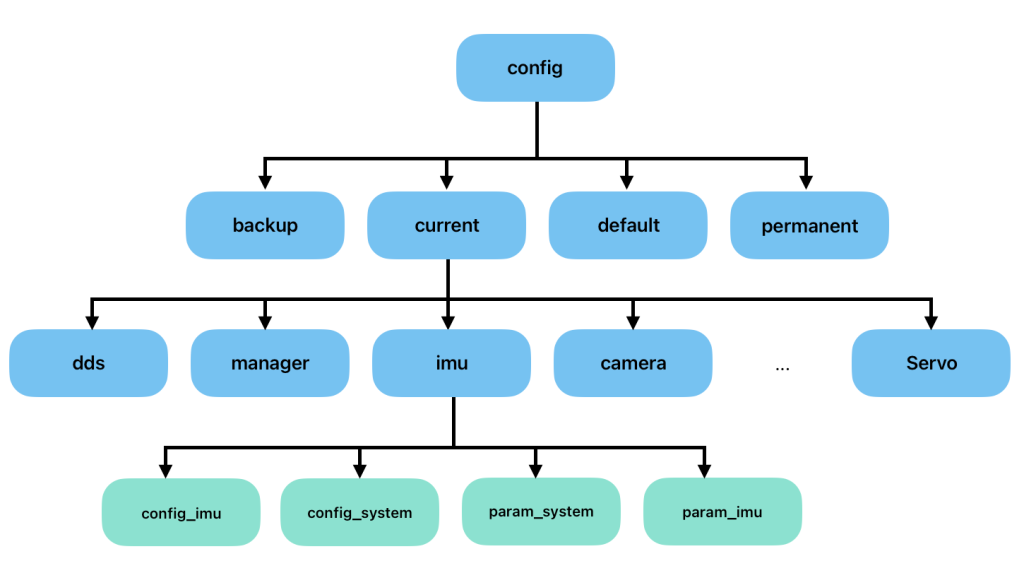
Here, for each component type, you will see a separate folder containing two types of YAML files. The first type is the config files, which are related to startup configurations, and the second type is the param files, which are related to real-time ROS parameter interactions.
¶ Mass Production Automation (Without GUI)
For automated provisioning in mass production, you can skip the GUI and configure each device over SSH by editing files directly in:
/opt/olive/config/current/For example, you can update launch_config_manager.yaml to set ROS 2 domain, DDS mode, USB protocol, network IP, and time-sync configuration:
node:
  name_space: default
  param_profile: linux
  frame_id: base_link
  time_sync_mode: NTP
  discovery: default
  ros2_domain_id: 0
  ros2_distro: humble
  usb_protocol: ECM
  ros2_dds_mode: fastrtps
  device_ip: 192.168.7.100
  device_ip_mask: 255.255.255.0
  device_ip_gateway: 192.168.7.200
  device_ip_ntp_server: 192.168.7.200
  mode: 1
debug: 0You can force-update these values from your automation pipeline (for example, Ansible, shell scripts, factory scripts), then restart the manager service to apply changes:
sudo systemctl restart olive-manager.serviceTip: On some images, the manager service may be named differently (for example olive-sys-manager.service).