¶ ROS 2 Installation
ROS 2 (Robot Operating System 2) is the next version of the Robot Operating System (ROS), and it was developed to address some of the limitations of the original ROS. It provides a wide range of tools and libraries for building and operating robots, similar to ROS, and it's designed to be modular and extensible.
Here are some of the main features and improvements of ROS 2:
Communication: ROS 2 uses a new communication middleware called Fast RTPS (Real Time Publish Subscribe) which is based on the DDS (Data Distribution Service) standard. This allows for improved performance and reliability in distributed systems, and enables features such as Quality of Service (QoS) policies and support for different transport protocols.
Operating System support: ROS 2 is designed to work with a variety of operating systems including Windows, Linux, and MacOS.
Security: ROS 2 introduces support for secure communication and authentication, which is a fundamental requirement for safety-critical systems.
Performance: ROS 2 has been designed to have better real-time performance and better scalability than ROS1.
Language support: ROS 2 supports multiple programming languages, including C++, Python and now also Rust, which allows developers to use the language that is most appropriate for their application.

ROS 2 is the next step in the evolution of the ROS framework, and it has been developed to better meet the needs of real-world robots and autonomous systems. It's more secure, more efficient
"Nearly 55% of total commercial robots shipped in 2024 will have at least one ROS package installed, creating a large installed base of ROS-enabled robots."
https://github.com/olive-robotics/ros-robotics-companies
¶ Native ROS 2
| ROS 2 Distro | |
| ROS 2 Humble - Ubuntu 22.04 |
 |
| ROS 2 Jazzy - Ubuntu 24.04 |
 |
Native ROS 2 components are hardware and software components that have been specifically designed to work with the Robot Operating System 2 (ROS 2). These components are able to communicate using the new communication middleware called Fast RTPS (Real Time Publish Subscribe) and can be integrated seamlessly into a robot system that is built with ROS 2.
Examples of native ROS 2 components can include:
- Sensors such as cameras, lidars, and IMUs
- Actuators such as motors and servos
- Controller boards and Single-Board Computers (SBCs) that run a ROS-compatible operating system
- Software libraries and drivers that provide ROS 2 interfaces for interacting with the hardware
- ROS 2 packages that provide additional functionality, such as localization, path planning, and control
Using native ROS 2 components in building a robot allows developers to leverage the powerful and flexible libraries and tools provided by ROS 2 and easily integrate their components with other parts of the robot system. It also allows them to take advantage of the large and active community of developers and researchers who use ROS 2 and to build upon the existing knowledge and resources that are available for ROS 2.
In summary, Native ROS 2 components are hardware and software components that have been specifically designed to work with the Robot Operating System 2 (ROS 2) that can communicate using the new communication middleware called Fast RTPS (Real Time Publish Subscribe) and that can be integrated seamlessly into a robot system that is built with ROS 2. They allow developers to leverage the powerful and flexible libraries and tools provided by ROS 2 and easily integrate their components with other parts of the robot system.
¶ Installing ROS 2 Humble / Jazzy on the Host PC
¶ ROS 2 Humble
Installing ROS 2 Humble on your system can be done using the following general steps:
Set locale and make sure you have a locale which supports UTF-8. If you are in a minimal environment (such as a docker container), the locale may be something minimal like POSIX. We test with the following settings. However, it should be fine if you’re using a different UTF-8 supported locale.
locale
sudo apt update
sudo apt install locales
sudo locale-gen en_US en_US.UTF-8
sudo update-locale LC_ALL=en_US.UTF-8 LANG=en_US.UTF-8
export LANG=en_US.UTF-8
localeAdd the ROS 2 Humble repository to your system. Depending on your distribution, you can add the repository to your system's package manager.
sudo apt install software-properties-common
sudo add-apt-repository universe
sudo apt update && sudo apt install curl
sudo curl -sSL https://raw.githubusercontent.com/ros/rosdistro/master/ros.key -o /usr/share/keyrings/ros-archive-keyring.gpgSet up your system's key to allow secure communication with the ROS 2 Humble package repository by running the following
echo "deb [arch=$(dpkg --print-architecture) signed-by=/usr/share/keyrings/ros-archive-keyring.gpg] http://packages.ros.org/ros2/ubuntu $(. /etc/os-release && echo $UBUNTU_CODENAME) main" | sudo tee /etc/apt/sources.list.d/ros2.list > /dev/nullUpdate the package lists on your system:
sudo apt updateInstall the ROS 2 Humble packages. You can install the desktop variant with the following command:
sudo apt install ros-humble-desktopInstall the tools
sudo apt install ros-dev-toolsInitialize ROS 2 environment. Before you can use ROS 2, you will need to initialize the environment.
source /opt/ros/humble/setup.bashVerify the installation by running some ROS 2 command like
ros2 --help
ros2 run demo_nodes_cpp talkerIt's also important to mention that, as with ROS 1, ROS 2 requires additional dependencies to be installed on the system. It's recommended to check the ROS 2 Humble installation documentation for more information on these dependencies and specific installation instructions according to your operating system, as well as the ROS 2 Humble API documentation for additional information on ROS 2 and the available packages.
¶ Third-party Packages
To run RQT image viewer and IMU viewer in RViz you will need to install additional packages as follows:
sudo apt install ros-humble-perception
sudo apt install ros-humble-imu-tools
¶ ROS 2 Jazzy
Installing ROS 2 Jazzy (the latest version of ROS 2) on your system can be done using the following general steps:
Set locale and make sure you have a locale which supports UTF-8. If you are in a minimal environment (such as a docker container), the locale may be something minimal like POSIX. We test with the following settings. However, it should be fine if you’re using a different UTF-8 supported locale.
locale
sudo apt update
sudo apt install locales
sudo locale-gen en_US en_US.UTF-8
sudo update-locale LC_ALL=en_US.UTF-8 LANG=en_US.UTF-8
export LANG=en_US.UTF-8
localeAdd the ROS 2 Jazzy repository to your system. Depending on your distribution, you can add the repository to your system's package manager.
sudo apt install software-properties-common
sudo add-apt-repository universe
sudo apt update && sudo apt install curl
sudo curl -sSL https://raw.githubusercontent.com/ros/rosdistro/master/ros.key -o /usr/share/keyrings/ros-archive-keyring.gpgSet up your system's key to allow secure communication with the ROS 2 Jazzy package repository by running the following
echo "deb [arch=$(dpkg --print-architecture) signed-by=/usr/share/keyrings/ros-archive-keyring.gpg] http://packages.ros.org/ros2/ubuntu $(. /etc/os-release && echo $UBUNTU_CODENAME) main" | sudo tee /etc/apt/sources.list.d/ros2.list > /dev/nullUpdate the package lists on your system:
sudo apt updateInstall the ROS 2 Jazzy packages. You can install the desktop variant with the following command:
sudo apt install ros-jazzy-desktopInstall the tools
sudo apt install ros-dev-toolsInitialize ROS 2 environment. Before you can use ROS 2, you will need to initialize the environment.
source /opt/ros/jazzy/setup.bashVerify the installation by running some ROS 2 command like
ros2 --help
ros2 run demo_nodes_cpp talkerIt's also important to mention that, as with ROS 1, ROS 2 requires additional dependencies on the system. We recommend checking the ROS 2 Jazzy installation documentation for details and OS-specific instructions, as well as the ROS 2 Jazzy API documentation for package-level information.
¶ Third-party Packages
To run RQT image viewer and IMU viewer in RViz you will need to install additional packages as follows:
sudo apt install ros-jazzy-perception
sudo apt install ros-jazzy-imu-tools
If you want to activate ROS 2 jazzy on the device follow these steps:
Installing the Jazzy Build for Olive Components
Follow these steps to install and activate the Jazzy ROS 2 distro on your Olive Component:
¶ 1. Download the Latest Software Patch and Jazzy Build
a. Make sure you are using the latest software patch (Patch > 1787)
https://olive-robotics.com/docs2/patch-update/
b. Download the prebuilt Jazzy package from the Olive Robotics website:
wget https://olive-robotics.com/uploads/patch/jazzy.zip¶ 2. Upload to Olive Component
Transfer the file to your Olive Component over SCP:
scp jazzy.zip olive@192.168.7.100:¶ 3. SSH into the Device
Access your device via SSH (password is one):
ssh olive@192.168.7.100¶ 4. Extract and Install
Unzip and move the Jazzy distribution to the ROS 2 directory:
unzip jazzy.zip
sudo mv jazzy /opt/ros2/
rm jazzy.zip¶ 5. Restart the Device
Reboot or restart the Olive Component to apply changes:
sudo reboot¶ 6. Activate Jazzy in the GUI
- Open the GUI for Olive Component.
- In the Distro dropdown menu, select Jazzy.
- Click Save All in All Settings.
The device will reboot once again to finalize the switch. After reboot, the IMU will start publishing using the native Jazzy distro.
¶ RIG Reconfigure
The GitHub repository "rig_reconfigure" by teamspatzenhirn is a GUI tool designed for editing ROS 2 parameters at runtime. This tool seems to be specifically aimed at managing and modifying the parameters within ROS 2, a popular robotics middleware framework, providing a graphical interface for ease of use. The repository is public and licensed under the MIT license, indicating open-source availability. The primary programming languages used in the project are C++ and CMake. For more details, you can visit the repository here.
- Install from apt
sudo apt install ros-humble-rig-reconfigure
- Run the rig
ros2 run rig_reconfigure rig_reconfigure
- It will show your ros2 parameters and you can edit them simply
¶ Plot Juggler
PlotJuggler is a ROS 2 package designed to streamline data visualization and analysis. With its intuitive interface and robust functionality, PlotJuggler allows users to plot and inspect data from multiple ROS 2 topics for faster diagnostics and insight.
To use PlotJuggler for ROS 2 Humble, follow these steps:
- Installation: Install the PlotJuggler package using standard ROS 2 package management.
sudo apt install ros-humble-plotjuggler*
- run
ros2 run plotjuggler plotjuggler
- Why PlotJuggler is useful:
- ROS 2 Compatibility: PlotJuggler is designed for ROS 2 environments, ensuring seamless integration and strong performance.
- User-Friendly Interface: Its interface and workflow are straightforward for both beginners and advanced users.
- Real-Time Visualization: PlotJuggler supports live data streams for immediate analysis and debugging.
- Customization Options: You can tailor topic subscriptions and plot layouts to your application.
- Open-Source Flexibility: As an open-source package, PlotJuggler supports community-driven improvements.
¶ RViz 2
ROS2 (Robot Operating System 2) is an open-source framework designed to aid in the development and control of robotic systems. It is the second iteration of ROS, featuring improvements in performance, security, and modularity. Rviz2 (short for ROS Visualization 2) is a visualization tool specifically designed for ROS2, providing users with a graphical interface to visualize their robotic systems.
Rviz2 allows users to visualize various aspects of a robot's state, such as sensor data, the robot's position, and the planned path for navigation. This visualization is particularly helpful for debugging and understanding complex robotic systems, as it provides an intuitive way to observe how different components interact with each other.
Some key features of Rviz2 include:
3D visualization: Rviz2 can render 3D representations of a robot's environment, enabling users to view sensor data, robot positions, and other relevant information in a more intuitive manner.
Customizable interface: Rviz2 features a customizable interface, allowing users to add, remove, or rearrange panels and visualizations according to their preferences and requirements.
Plugin support: Rviz2 supports a wide range of plugins, enabling users to extend its functionality by adding new visualization tools and features tailored to their specific needs.
Cross-platform compatibility: Rviz2 is designed to work with various operating systems, such as Linux, macOS, and Windows, ensuring that developers can use the tool on their preferred platform.
In summary, Rviz2 is a powerful visualization tool for ROS2, offering users the ability to better understand and debug their robotic systems by displaying relevant data in a clear and intuitive manner.
For IMU visualization you will need to install
sudo apt install ros-humble-imu-toolsIf you are going to visualize Olive IMU data, make sure you set the frame ID to "olive" (the default frame ID). If you are unsure about the frame ID, check it in the web GUI dashboard.
¶ RQT
ROS (Robot Operating System) is a flexible framework for writing robot software. It provides a wide range of tools and libraries for building and operating robots, including tools for communication, perception, and control. One of the tools that is part of ROS is rqt (Robot Qt GUI Framework), which is a collection of plugins that provides a flexible and user-friendly way to interact with the robot and its sensors.
rqt provides a convenient way to visualize and analyze sensor data, as well as to send commands and change parameters on the robot. It provides a set of common plugins for visualization and debugging, including a plotter, logger, and profiler. Additionally, rqt allows you to create custom plugins to suit your specific needs.
The use of rqt in combination with the ROS based software architecture of Olive Robotics' modules allows a developer to use a whole range of tools and resources to customize, debug and profile the device. It makes it easy to visualize and debug your robot's sensor data, as well as to make changes to its behavior in real-time.
In summary, rqt is a collection of plugins for the ROS (Robot Operating System) framework that provides a flexible and user-friendly way to interact with the robot and its sensors, it allows to visualize and analyze sensor data, as well as to send commands and change parameters on the robot. It also allows to create custom plugins to suit specific needs.
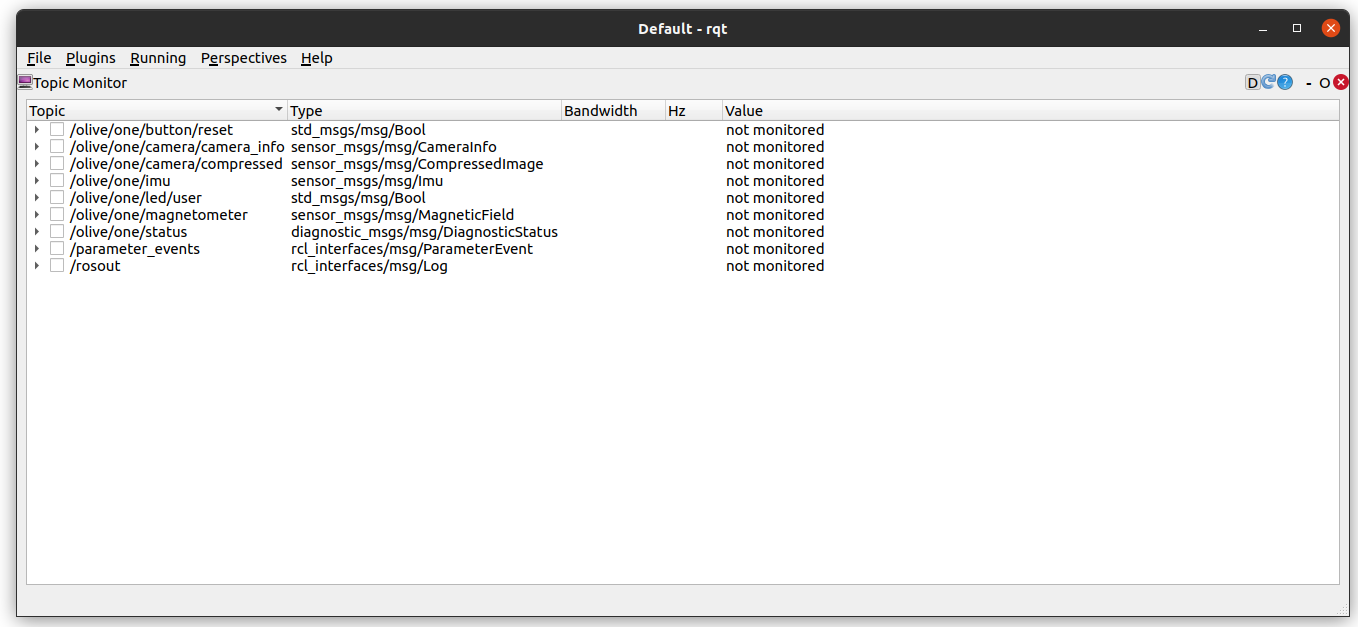
¶ Topic Monitor
Rqt provides a plugin called the "Topic Monitor" that allows you to view the messages being published on different ROS topics in real-time. This is a useful tool for debugging and troubleshooting, as well as for understanding the communication patterns within your robot system.
To use the Topic Monitor in rqt, you first need to launch rqt by running the command "rqt" in a terminal. Once rqt is open, you can go to the "Plugins" menu, and select "Topic" -> "Topic Monitor" to open the plugin. The Topic Monitor will show a list of all the currently available topics on the system, and you can select any topic to see the messages that are being published on it.
The Topic Monitor will display the messages in raw format, with the fields and their values, and it also allows to view the messages in a more friendly format such as JSON, YAML, etc. You can also select a specific message type, to only display messages of a certain type.
Using the topic monitor plugin, you can visualize the data being published on a topic, and compare it to the expected data. It can also help you identify any issues with the data that is being published, such as missing values or unexpected values, and it will help you determine if the data is being published at the expected frequency.
In summary, the Topic Monitor plugin in rqt provides a way to view the messages being published on different ROS topics in real-time, it's a useful tool for debugging and troubleshooting, as well as for understanding the communication patterns within your robot system. It allows to visualize the data being published on a topic, and compare it to the expected data, identify any issues and determine if the data is being published at the expected frequency.
¶ RQT Dynamic Reconfigure
RQT Dynamic Reconfigure is a plugin for the rqt (Robot Qt GUI Framework) that allows you to change the parameters of your robot's nodes at runtime. This is useful for adjusting the behavior of your robot or tuning its performance without needing to restart the node or recompile your code.
To use the RQT Dynamic Reconfigure plugin, you first need to launch rqt by running the command "rqt" in a terminal. Once rqt is open, you can go to the "Plugins" menu, and select "Configuration" -> "Dynamic Reconfigure" to open the plugin. The Dynamic Reconfigure plugin shows a list of all the currently available nodes that support dynamic reconfiguration, and you can select any node to see its parameters.
Once you select a node, the plugin will display the current values of its parameters and allow you to change them directly on the plugin's interface. It also provides the ability to restore default values, reload the config file and save the new config to a file.
The RQT Dynamic Reconfigure plugin is particularly useful when you're trying to optimize your robot's performance or fine-tune its behavior. It's also useful when you're testing different configurations, or when you're trying to troubleshoot an issue.
In summary, the RQT Dynamic Reconfigure plugin is a useful tool that allows you to change the parameters of your robot's nodes at runtime, it allows you to adjust the behavior of your robot or tune its performance without needing to restart the node or recompile your code. It also provides the ability to restore default values, reload the config file, and save the new config to a file.
¶ RQT Message Publishing
The rqt Message Publisher is a plugin for the rqt (Robot Qt GUI Framework) that allows you to publish messages on ROS topics. This is useful for testing and debugging the communication between nodes in your robot system, as well as for manual control of the robot's behavior.
To use the rqt Message Publisher plugin, you first need to launch rqt by running the command "rqt" in a terminal. Once rqt is open, you can go to the "Plugins" menu, and select "Topic" -> "Message Publisher" to open the plugin. Once the plugin is open, you can select the topic you want to publish messages on from a list of available topics.
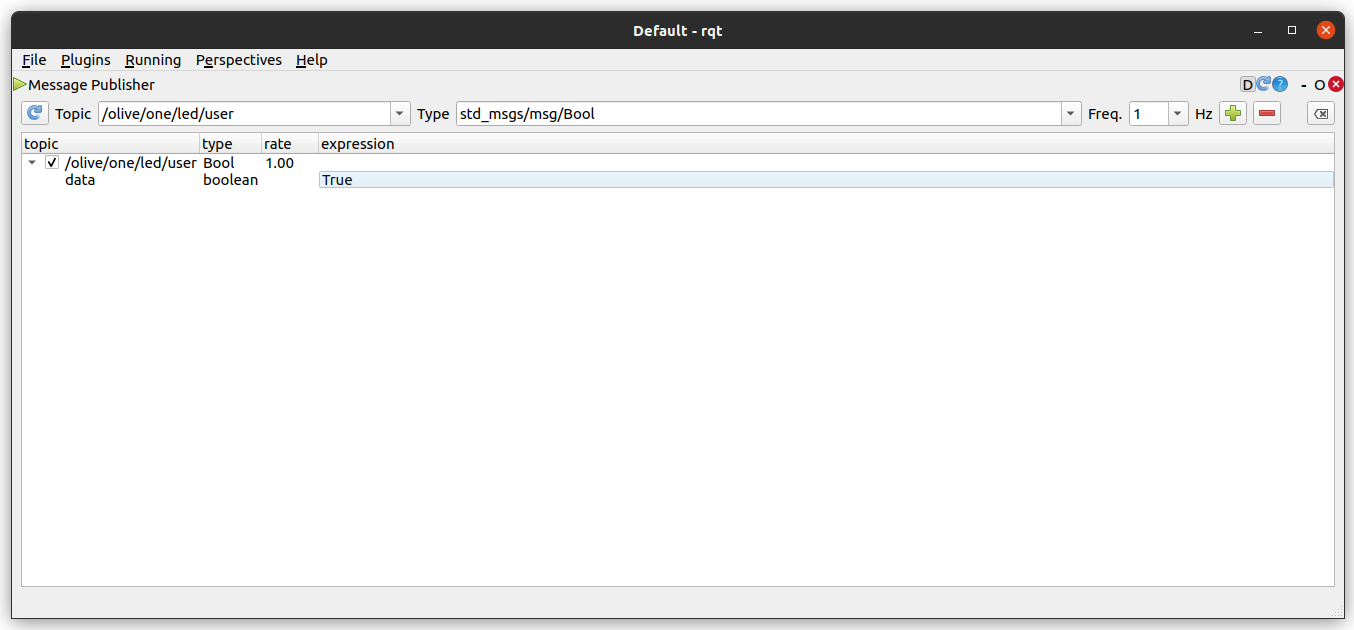
The plugin will then display a form that allows you to enter the values for the fields of the message, and you can then press the "Publish" button to send the message. The plugin also allows you to save a message as a configuration file, or to load a previously saved configuration file, this can be useful when you want to publish the same message multiple times.
The rqt Message Publisher is a useful tool for testing and debugging the communication between nodes in your robot system. It also allows you to send custom messages to the robot to manually control its behavior, this can be especially useful during development or when troubleshooting issues.
In summary, the rqt Message Publisher is a plugin for the rqt (Robot Qt GUI Framework) that allows you to publish messages on ROS topics, it allows you to test and debug the communication between nodes in your robot system. It also allows you to manually control the robot's behavior by sending custom messages, it also allows to save and load messages to a configuration file.
¶ RQT Image Viewer
For image visualization you will need to install:
Humble:
sudo apt install ros-humble-perceptionJazzy:
sudo apt install ros-jazzy-perception
¶ ROS 2 Bridge
¶ ROS 1 - ROS 2 Bridge
As ROS and ROS2 are not completely compatible, a bridge is needed to make it possible to use both versions together. The bridge allows messages and service calls to be passed between nodes running on ROS and nodes running on ROS2. This allows for a smooth transition between the two systems, and allows you to take advantage of new features and capabilities of ROS2 while still using existing ROS-based components.
ROS Bridge is a package that provides this capability by connecting the ROS1 and ROS2 middleware, this package allows ROS1 nodes to communicate with ROS2 nodes, and vice versa, by wrapping the communication calls in a way that makes them transparent to the nodes.
The ROS bridge package provide several functionalities, such as :
Translation of messages between ROS1 and ROS2 Translation of services between ROS1 and ROS2 Translation of actions between ROS1 and ROS2 Using the ROS bridge to ROS2 allows for an incremental migration of a robot system from ROS to ROS2, where it's possible to gradually replace parts of the system with ROS2-based components without disrupting the existing ROS-based components.
In summary, ROS and ROS2 are not completely compatible, to use them together a bridge is needed. ROS Bridge is a package that provides this capability by connecting the ROS1 and ROS2 middleware. It allows to translate messages, services, and actions between ROS1 and ROS2, making it possible to use both versions together and gradually migrate a robot system from ROS to ROS2.
¶ How To RUN The ROS Bridge?
The ROS bridge package is typically run on a machine that is connected to both the ROS and ROS2 systems that you want to bridge. The package includes a set of nodes that run on both systems, and the nodes communicate with each other to pass messages and service calls between the systems.
Here are the general steps to run the ROS bridge package:
- Install the package on your system. Depending on the system you are using, you can install the package using package manager like apt, rosdep, or source build.
- Start the ROS1 and ROS2 master nodes. The bridge package requires that both the ROS1 and ROS2 master nodes are running and discoverable.
- Start the bridge nodes. You will typically start the bridge nodes on the machine that is connected to both the ROS and ROS2 systems. These nodes act as intermediaries that pass messages and service calls between the two systems.
- Configure the bridge nodes. Depending on your specific use case, you may need to configure the bridge nodes to set parameters such as the ROS1 and ROS2 master URLs or the topics and services that should be bridged.
- Verify that the bridge is working by checking the output from the bridge nodes and by subscribing to topics or calling services on the bridged systems
For more information on the specifics of running the ROS bridge package, you can refer to the package's documentation, which typically includes detailed instructions and examples on how to run and configure the package.
In summary, to run the ROS Bridge package, you first need to install it on your system, start the ROS1 and ROS2 master nodes, start the bridge nodes, configure the bridge nodes and finally, verify that the bridge is working. It's always recommended to check the package's documentation for specific instructions.
¶ Third-party Bridges
¶ Matlab
ROS Toolbox provides an interface connecting MATLAB® and Simulink® with the Robot Operating System (ROS and ROS 2). With the toolbox, you can design a network of ROS nodes and combine MATLAB or Simulink generated ROS nodes with your existing ROS network.
The toolbox includes MATLAB functions and Simulink blocks to visualize and analyze ROS data by recording, importing, and playing back rosbag files. You can also connect to a live ROS network to access ROS messages.
The toolbox lets you verify ROS nodes via desktop simulation and by connecting to external robot simulators such as Gazebo or to hardware. ROS Toolbox supports C++ and CUDA® code generation (with MATLAB Coder™, Simulink Coder, and GPU Coder™), enabling you to automatically generate ROS nodes from a MATLAB script or Simulink model and deploy to simulated or physical hardware. Support for Simulink external mode lets you view messages and change parameters while your model is running on hardware.
https://in.mathworks.com/help/ros
¶ Omniverse
NVIDIA Omniverse is a groundbreaking platform that enables real-time 3D content creation and collaboration in shared virtual environments. Its importance for robotics lies in the ability to streamline the development, testing, and deployment of complex robotic systems. By providing a unified platform where engineers, designers, and researchers can work together using various software applications, Omniverse facilitates the creation of realistic and accurate simulations. This allows for more efficient development and validation of robotic algorithms, improved training of AI models, and enhanced safety and performance of robotic systems in real-world scenarios.
https://docs.omniverse.nvidia.com/app_isaacsim/app_isaacsim/ext_omni_isaac_ros_bridge.html
¶ Unity3D
Unity3D is a powerful, cross-platform game engine widely used in game development that has also gained traction in the robotics community. By leveraging Unity3D’s real-time rendering, physics engines, and extensive asset library, developers can simulate complex robotic systems, sensor data, and sophisticated interactions in a virtual environment. This not only accelerates prototyping by reducing hardware testing time but also simplifies development workflows, as designers can experiment with new designs, algorithms, and behaviors within the simulation before deploying to physical platforms. Additionally, many robotics teams use the ROS2 to Unity3D bridge, which allows them to send and receive messages directly from Unity3D to a ROS2 environment. This bridging enables a seamless integration of robotic simulation data with the broader ROS2 ecosystem—facilitating rapid development, testing, and validation of robotic software stacks in a more visually immersive simulation environment.
https://github.com/RobotecAI/ros2-for-unity
¶ Data Distribution Service (DDS)
¶ Supported DDS implementations
| Product name | License | RMW implementation | Status |
|---|---|---|---|
| eProsima Fast DDS | Apache 2 | rmw_fastrtps_cpp | Default / Stable |
| Eclipse Cyclone DDS | Eclipse Public License v2.0 | rmw_cyclonedds_cpp | Supported / Stable |
| Zetascale Zenoh | commercial, research | rmw_zenoh | Supported / Stable |
| RTI Connext | commercial | rmw_connext_cpp | Test in progress |
| SafeDDS | commercial | rmw_safedds_cpp | Test in progress |
¶ 1. Fast DDS (formerly Fast RTPS)
The default DDS implementation for most ROS2 distributions.
- Repository: https://github.com/eProsima/Fast-DDS
- RMW package:
rmw_fastrtps_cpp
¶ Example Configuration for Fast DDS on Olive Device
This configuration is maintained automatically in the system, and you don't need to change it. However, it's useful to be familiar with it. If desired, you can extend this configuration to your host computer as well. This becomes handy when you wish to modify the buffer size or blacklist certain network interfaces that you don't want to use in ROS2.
The configuration is located in
/opt/olive/config/current/fastdds.xmlwith the following content:
<?xml version="1.0" encoding="UTF-8" ?>
<dds>
<profiles xmlns="http://www.eprosima.com/XMLSchemas/fastRTPS_Profiles">

    <transport_descriptors>
        <transport_descriptor>
            <transport_id>udp_config</transport_id>
            <type>UDPv4</type>
            <interfaceWhiteList>
                <address>192.168.7.100</address>
            </interfaceWhiteList>
            <sendBufferSize>4259840</sendBufferSize>
            <receiveBufferSize>4259840</receiveBufferSize>
        </transport_descriptor>
    </transport_descriptors>

    <participant profile_name="participant_xml_profile_qos_socketbuffers" is_default_profile="true">
        <rtps>
            <userTransports>
                <transport_id>udp_config</transport_id>
            </userTransports>
            <!-- Buffer sizes, has big effect on performance.
                 * Values
                   * Maximum set on boot: 2147483647 ~ 20MB,
                   * 4259840 ~ 4MB.
                   * 2129920 ~ 2MB - performance similar to 4MB
                   * 1048576 ~ 1MB - worse performance
                 * For some reason, setting the largest value decreases performance.
                 * Make sure to match the transport_descriptor values
             -->
            <!-- See comments in jetson.xml -->
            <sendSocketBufferSize>4259840</sendSocketBufferSize>
            <listenSocketBufferSize>4259840</listenSocketBufferSize><!-- Maximum set on boot: 2147483647, moderate is 2129920 -->
            <useBuiltinTransports>false</useBuiltinTransports>
        </rtps>
    </participant>

</profiles>
</dds>¶ 2. Cyclone DDS
A lightweight, high-performance DDS implementation by Eclipse Foundation.
- Repository: https://github.com/eclipse-cyclonedds/cyclonedds
- RMW package:
rmw_cyclonedds_cpp
These are the most common DDS implementations used in ROS2. To switch between them, follow the instructions from the previous answer to set the RMW_IMPLEMENTATION environment variable to the desired RMW package.
The following open-source DDS implementations are available for ROS 2, and you can switch between them according to your needs:
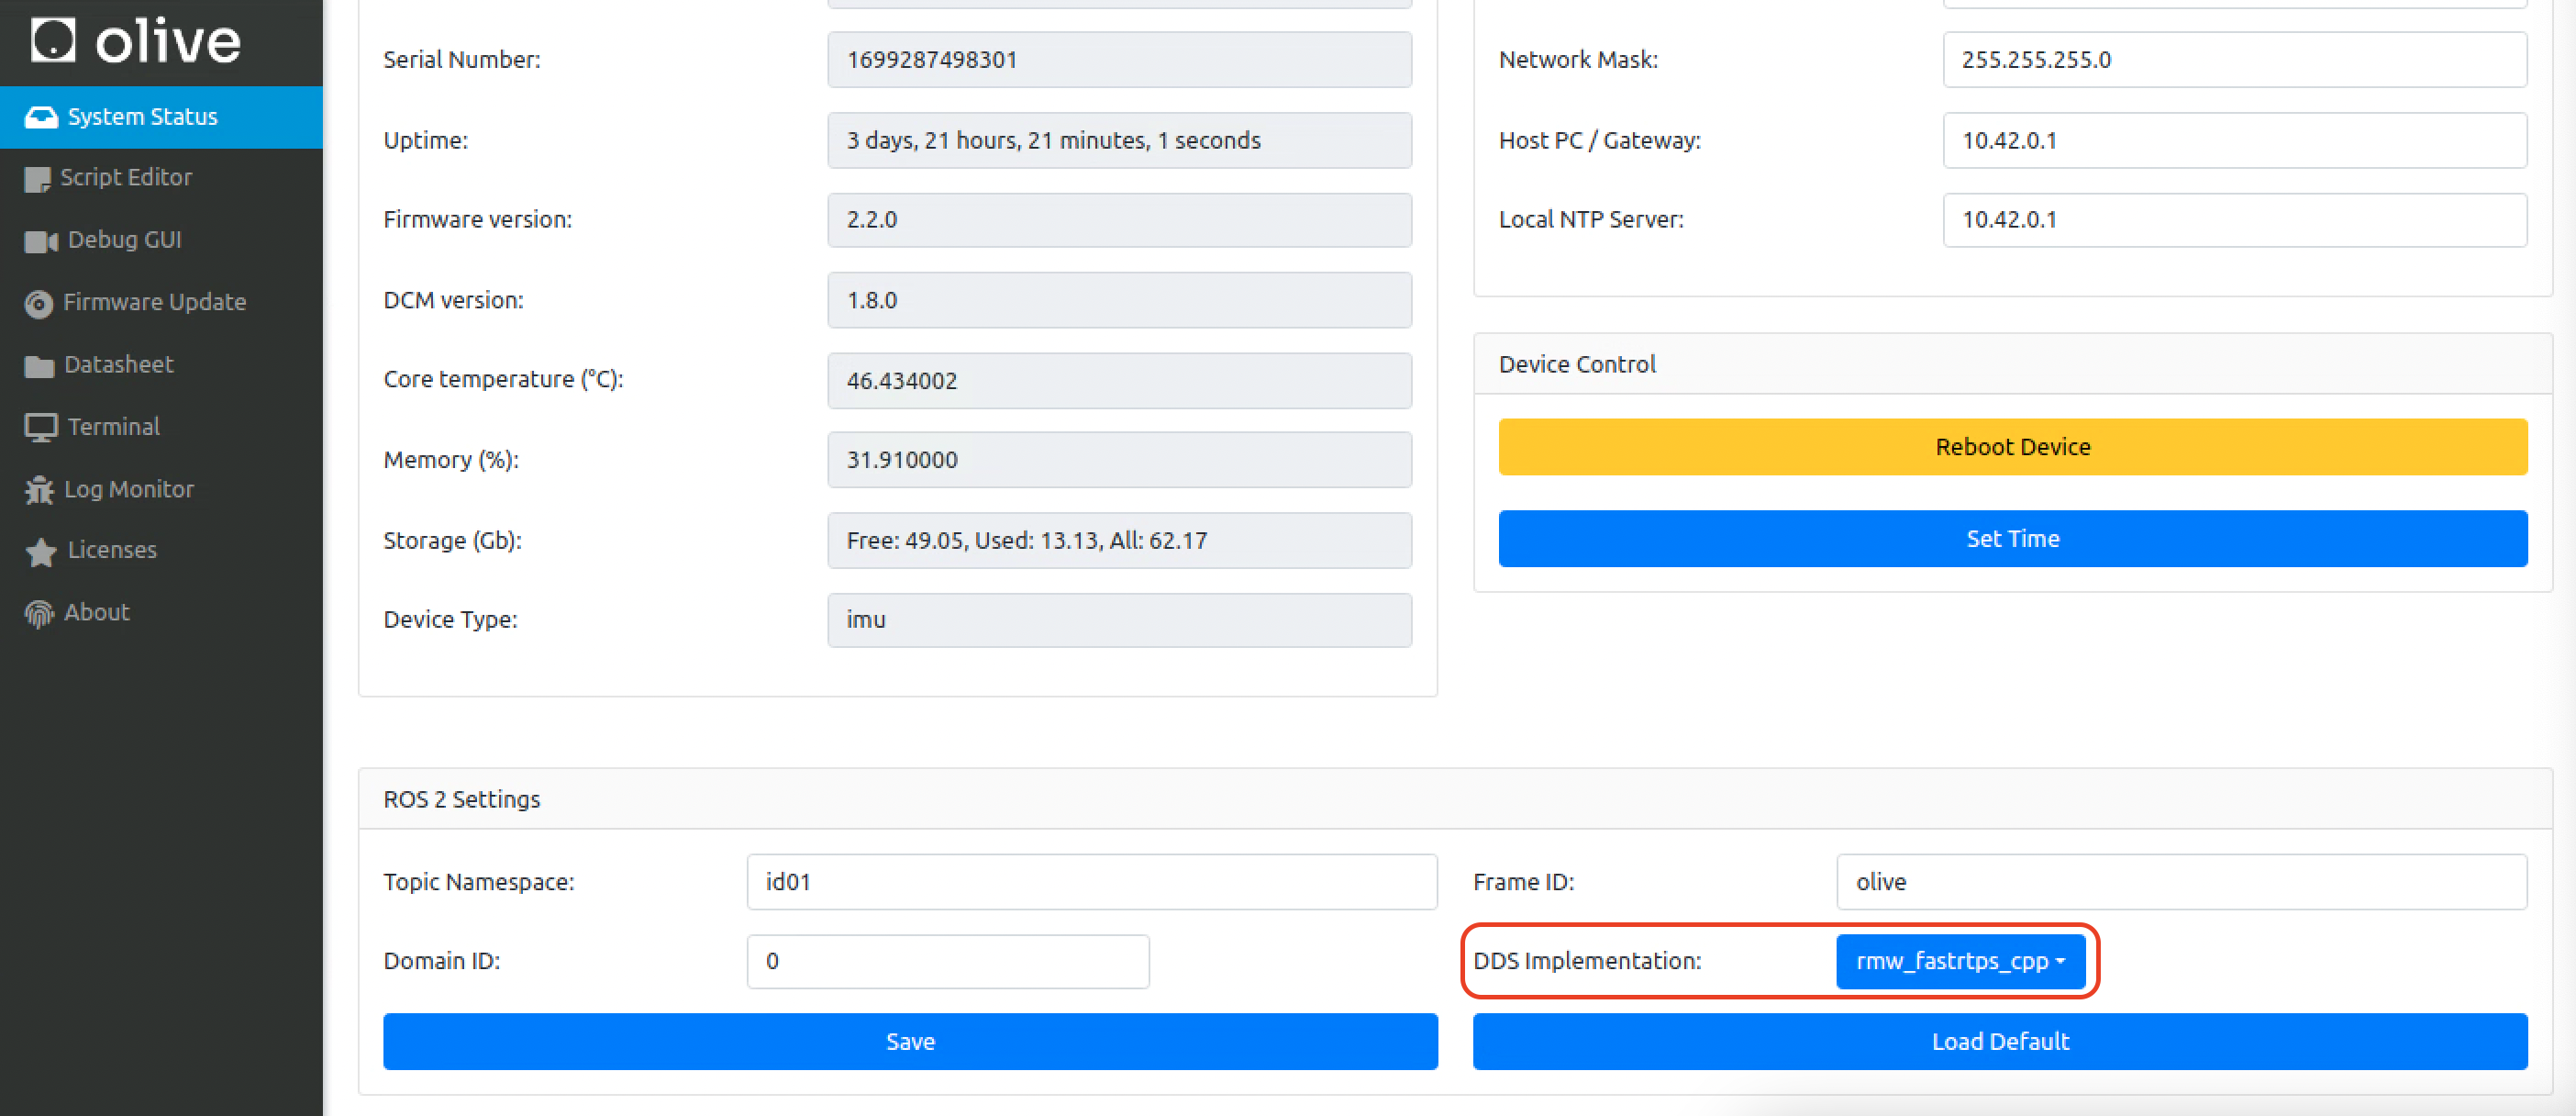
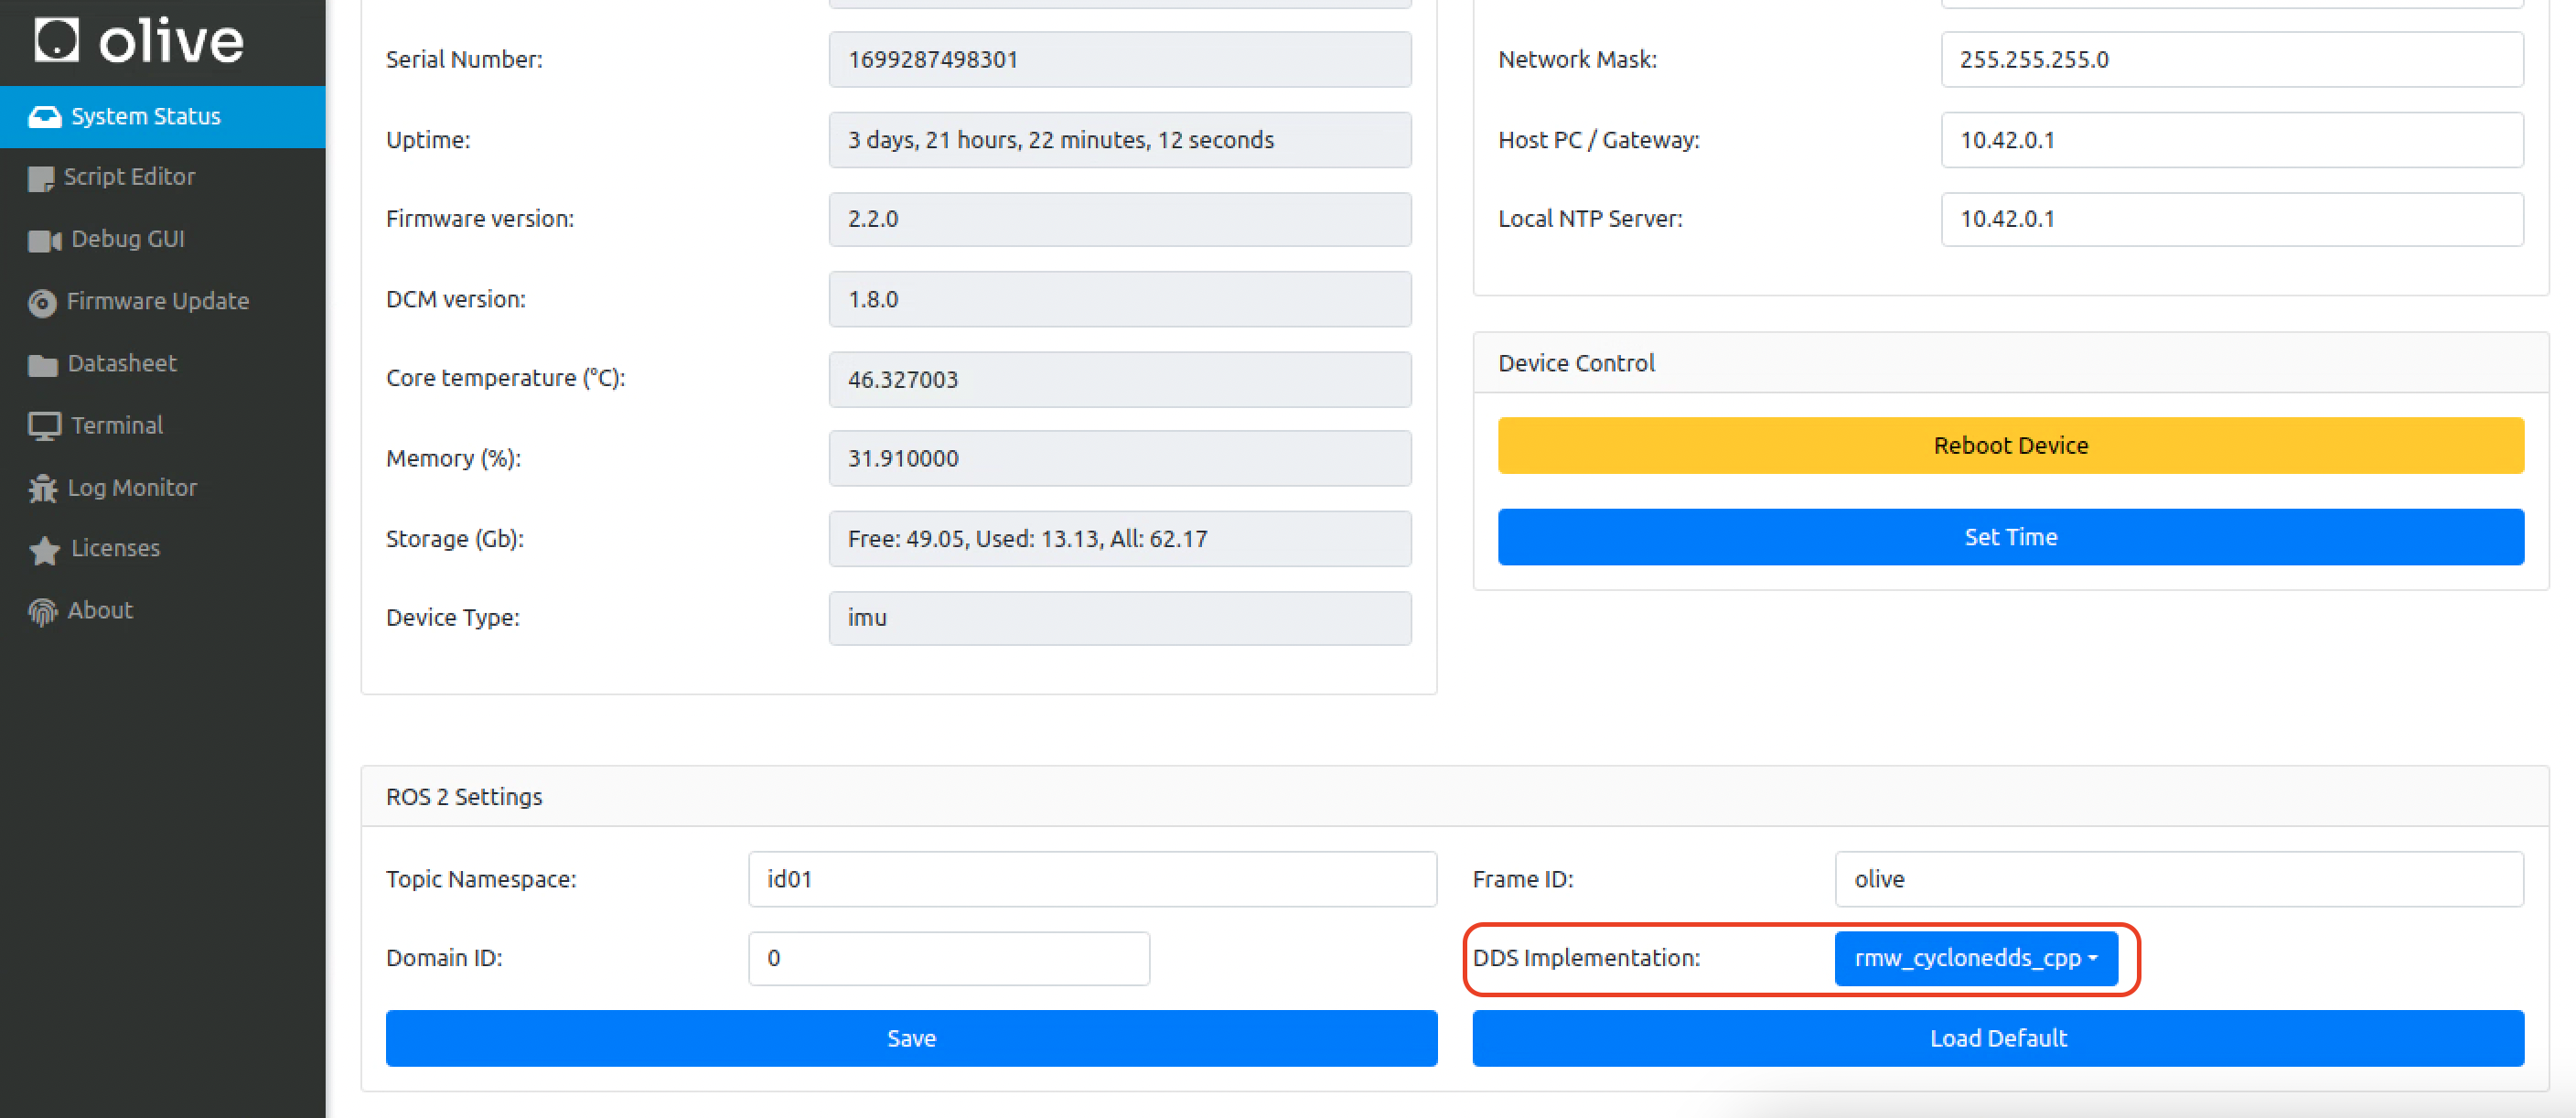
¶ How to change DDS middleware on the Olive device?
The default DDS implementation on Olive components are Fast DDS. However Cyclone DDS is also supported. You can change the middleware implementation using the GUI:
¶ How to change ROS2 DDS implementation to Cyclone DDS for the host computer?
Follow these steps to change the ROS2 DDS implementation to Cyclone DDS:
¶ 1. Install Cyclone DDS
First, make sure that Cyclone DDS is installed on your system. You can install it using the following commands for different platforms:
- Ubuntu:
sudo apt update
sudo apt install ros-humble-rmw-cyclonedds-cpp
- macOS, Windows, or building from source:
Please refer to the official Cyclone DDS installation instructions at
https://github.com/eclipse-cyclonedds/cyclonedds/blob/master/INSTALL.md
¶ 2. Set Cyclone DDS as the default DDS implementation
You can change the default DDS implementation by setting the RMW_IMPLEMENTATION environment variable. You can do this either temporarily or permanently.
- Temporarily (for the current terminal session):
- Bash (Linux and macOS):
export RMW_IMPLEMENTATION=rmw_cyclonedds_cpp - PowerShell (Windows):
$env:RMW_IMPLEMENTATION="rmw_cyclonedds_cpp"
After setting the variable, you can run your ROS2 nodes in the same terminal, and they will use Cyclone DDS.
- Permanently:
To make the change permanent, add the corresponding export or $env command to your shell configuration file. For Bash, this is typically .bashrc or .bash_profile (Linux) or .bash_profile (macOS). For PowerShell, this is typically the $PROFILE script.
¶ How to Verify the change?
To ensure that your ROS2 nodes are using Cyclone DDS, you can run the following command:
ros2 doctor --reportLook for the "middleware" section in the report. It should show "rmw_cyclonedds_cpp" as the active middleware.
That's it! Now your ROS2 system is using Cyclone DDS as the default DDS implementation.
¶ Example Configuration for Cyclone DDS on the host computer
Info:
On your host computer you need to tell Cyclone which network interface you want to use in your system. This is especially important when you have multiple network interfaces. In this example host IP is 192.168.7.200.
Then you need to add a variable in your .bashrc to define the location of your cyclone dds config. You need to tell where your cyclonedds.xml is located.
export CYCLONEDDS_URI="/home/[username]/cyclonedds.xml"then you need to stop and start the ros2 daemon.
ros2 daemon stop
ros2 daemon startPut this configuration in your host computers cyclonedds.xml.
<?xml version="1.0" encoding="UTF-8" ?>
<CycloneDDS xmlns="https://cdds.io/config" xmlns:xsi="http://www.w3.org/2001/XMLSchema-instance" xsi:schemaLocation="https://cdds.io/config https://raw.githubusercontent.com/eclipse-cyclonedds/cyclonedds/master/etc/cyclonedds.xsd">
    <Domain Id="any">
        <General>
            <Interfaces>
                <NetworkInterface address="192.168.7.200" priority="default" multicast="default" />
            </Interfaces>
            <AllowMulticast>default</AllowMulticast>
            <MaxMessageSize>65500B</MaxMessageSize>
        </General>
        <Tracing>
            <Verbosity>finest</Verbosity>
            <OutputFile>cyclonedds.log</OutputFile>
        </Tracing>
    </Domain>
</CycloneDDS>¶ 3) MoveIt Pro Docker DDS (Cyclone DDS)
This section shows how to make MoveIt Pro (Docker) communicate with Olive components over Cyclone DDS using the device’s 192.168.7.x link. MoveIt Pro ships with a Cyclone DDS setup that talks inside the container and with the host by default; we’ll bind it explicitly to the Olive USB-Ethernet interface and use unicast peers for deterministic discovery. docs.picknik.ai+1
¶ What you’ll get
- Container ↔ Host ↔ Olive DDS comms over 192.168.7.x
- Predictable discovery (multicast off, explicit peers)
- Clean compatibility with MoveIt Pro’s default Cyclone DDS behavior and ROS 2 RMW selection docs.picknik.ai+1
¶ Prerequisites
- MoveIt Pro (Docker) on the host; it uses Cyclone DDS by default. docs.picknik.ai
- Olive device reachable via USB-Ethernet 192.168.7.x (e.g., host
192.168.7.200, Olive192.168.7.100). - Cyclone DDS installed/available (ROS 2 Humble/Iron/Rolling include it), and familiarity with
CYCLONEDDS_URI. docs.ros.org+1
¶ Step 1 — Identify interface & IPs
On the host (MoveIt Pro machine):
ip -4 a | grep -A2 -E '192\.168\.7\.'
# e.g., enx... at 192.168.7.200On the Olive internal computer:
ip -4 a | grep -A2 -E '192\.168\.7\.'
# e.g., enx... at 192.168.7.100
¶ Step 2 — Create Cyclone DDS XMLs
Bind Cyclone to the 192.168.7.x address, disable multicast, and list peers explicitly. This follows the official Cyclone DDS XML schema and configuration guide. Cyclone DDS
¶ 2.1 Host (MoveIt Pro side): ~/.ros/cyclonedds.xml
<?xml version="1.0" encoding="UTF-8"?>
<CycloneDDS xmlns="https://cdds.io/config"
            xmlns:xsi="http://www.w3.org/2001/XMLSchema-instance"
            xsi:schemaLocation="https://cdds.io/config https://raw.githubusercontent.com/eclipse-cyclonedds/cyclonedds/master/etc/cyclonedds.xsd">
  <Domain Id="any">
    <General>
      <Interfaces>
        <NetworkInterface address="192.168.7.200"/>
      </Interfaces>
      <AllowMulticast>false</AllowMulticast>
      <MaxMessageSize>65500B</MaxMessageSize>
    </General>
    <Discovery>
      <Peers>
        <Peer address="192.168.7.100"/>
        <Peer address="127.0.0.1"/>
      </Peers>
    </Discovery>
    <Tracing><Verbosity>warning</Verbosity></Tracing>
  </Domain>
</CycloneDDS>¶ 2.2 Olive device: ~/.ros/cyclonedds.xml
<?xml version="1.0" encoding="UTF-8"?>
<CycloneDDS xmlns="https://cdds.io/config"
            xmlns:xsi="http://www.w3.org/2001/XMLSchema-instance"
            xsi:schemaLocation="https://cdds.io/config https://raw.githubusercontent.com/eclipse-cyclonedds/cyclonedds/master/etc/cyclonedds.xsd">
  <Domain Id="any">
    <General>
      <Interfaces>
        <NetworkInterface address="192.168.7.100"/>
      </Interfaces>
      <AllowMulticast>false</AllowMulticast>
      <MaxMessageSize>65500B</MaxMessageSize>
    </General>
    <Discovery>
      <Peers>
        <Peer address="192.168.7.200"/>
        <Peer address="127.0.0.1"/>
      </Peers>
    </Discovery>
    <Tracing><Verbosity>warning</Verbosity></Tracing>
  </Domain>
</CycloneDDS>
Notes:
AllowMulticast=falseand explicit<Peers>implement the “locked-down” discovery behavior documented for Pro’s defaults; we simply bind to your USB-Ethernet NIC instead of loopback/host-only. docs.picknik.ai
¶ Step 3 — Set environment variables
Tell ROS 2 to use Cyclone and point Cyclone to your XML. This is the standard mechanism in ROS 2/Cyclone DDS. docs.ros.org+1
Host (before starting MoveIt Pro):
export RMW_IMPLEMENTATION=rmw_cyclonedds_cpp
export CYCLONEDDS_URI="file://$HOME/.ros/cyclonedds.xml"Olive device:
export RMW_IMPLEMENTATION=rmw_cyclonedds_cpp
export CYCLONEDDS_URI="file://$HOME/.ros/cyclonedds.xml"If you persist these in ~/.bashrc, remember to open a new shell or source it. (Your DDS page already covers environment setup patterns.) see DDS setup
¶ Step 4 — Start MoveIt Pro (Docker) with host networking
Run Pro with --network host so the container shares the host’s network stack and can bind to 192.168.7.200 using your XML. This matches Pro’s documented container↔host DDS approach. docs.picknik.ai
docker run --rm -it --network host \
  -e RMW_IMPLEMENTATION=rmw_cyclonedds_cpp \
  -e CYCLONEDDS_URI="file://$HOME/.ros/cyclonedds.xml" \
  picknik/moveit_pro:latest
If you use the Pro SDK/compose setup, keep Cyclone as default; their SDK docs assume it. GitHub
¶ Step 5 — Verify connectivity
- Start an Olive publisher/node on the device.
- In the Pro container (or host shell):
ros2 doctor --report    # confirm "middleware: rmw_cyclonedds_cpp"
ros2 node list
ros2 topic listYou should see Olive nodes/topics. (Your DDS page also recommends ros2 doctor and environment checks.) Olive Robotics
¶ Optional tuning & multi-machine
- Larger data / images / point clouds: Adjust buffer sizes in the XML (
<MaxMessageSize>or advanced<Internal>watermarks) per Cyclone’s config reference. Cyclone DDS+1 - Add a second PC: Add each machine’s IP to every
<Peers>list and bind each to the interface it should use; keep multicast disabled for deterministic behavior. This is consistent with Pro’s “explicit peers” model beyond container↔host. docs.picknik.ai - Low-level sanity check:
ddsperf sanityfrom Cyclone can validate link quality outside ROS if you suspect network issues. GitHub
¶ References
- MoveIt Pro — Configure ROS 2 DDS (Cyclone default; container↔host only by default). docs.picknik.ai
- MoveIt Pro SDK (expects Cyclone by default). GitHub
¶ Custom IMU Message Bridge (UDP / RTI Context)
If you need a custom protocol or payload format beyond standard ROS 2 messages, you can run a custom bridge directly on the IMU device.
A practical approach is to run the bridge on the IMU itself. Since the X1 Ultra runs olixOS™ (Debian-based Linux) with onboard compute, you can access the device via SSH, subscribe to the internal ROS 2 IMU topic, and forward the data over UDP to your target system. This approach does not require firmware modification and gives you full control over payload format and destination.
¶ Workflow
- SSH into the IMU device.
- Create a Python script that subscribes to the IMU topic.
- Serialize the data to your custom format.
- Send the payload to your receiver (UDP, RTI-compatible endpoint, or another transport).
Example SSH:
ssh olive@192.168.7.100
# password: oneExample script path:
mkdir -p ~/custom_bridges
cd ~/custom_bridges
nano imu_udp_bridge.pyHere is a sample Python script that subscribes to the IMU topic and publishes the data over UDP in JSON format:
import json
import socket

import rclpy
from rclpy.node import Node
from sensor_msgs.msg import Imu


class ImuUdpBridge(Node):
  def __init__(self):
    super().__init__('imu_udp_bridge')

    # UDP target configuration
    self.udp_ip = "192.168.1.100"   # Change this to your receiver IP
    self.udp_port = 5005            # Change this to your receiver port
    self.sock = socket.socket(socket.AF_INET, socket.SOCK_DGRAM)

    # Subscribe to the actual IMU topic
    self.sub = self.create_subscription(
      Imu,
      '/olive/olixSense/x1/id001/imu',
      self.imu_callback,
      10
    )

  def imu_callback(self, msg: Imu):
    sample = {
      "timestamp_sec": msg.header.stamp.sec,
      "timestamp_nsec": msg.header.stamp.nanosec,
      "orientation": {
        "x": msg.orientation.x,
        "y": msg.orientation.y,
        "z": msg.orientation.z,
        "w": msg.orientation.w
      },
      "angular_velocity": {
        "x": msg.angular_velocity.x,
        "y": msg.angular_velocity.y,
        "z": msg.angular_velocity.z
      },
      "linear_acceleration": {
        "x": msg.linear_acceleration.x,
        "y": msg.linear_acceleration.y,
        "z": msg.linear_acceleration.z
      }
    }

    data = json.dumps(sample).encode('utf-8')
    self.sock.sendto(data, (self.udp_ip, self.udp_port))


def main():
  rclpy.init()
  node = ImuUdpBridge()
  rclpy.spin(node)
  node.destroy_node()
  rclpy.shutdown()


if __name__ == '__main__':
main()Run it on the IMU:
# Select your active distro (example: Humble)
source /opt/ros/humble/setup.bash

python3 ~/custom_bridges/imu_udp_bridge.py¶ RTI Context
If your target stack is RTI-based, keep the same architecture: subscribe once to the ROS 2 IMU topic and convert/publish to your RTI-side schema. In practice, you replace the UDP sender in the callback with your RTI publisher logic (for example, Connext DDS Python API or a local RTI relay process). This keeps your bridge isolated from firmware and easy to maintain.
¶ Notes
- You can customize field names, units, and packet schema freely.
- You can publish to multiple destinations from the same callback.
- For production, consider running the script as a systemd service for auto-start and restart handling.
¶ Recording and playing
Recording data using ROS2 (Robot Operating System 2) can be done with the ros2 bag command-line tool, which allows you to record and play back data from ROS2 topics. This is useful for logging sensor data, debugging, and testing your robotic applications. Here's a step-by-step guide to recording data using ROS2:
- Install
ros2bagandrosbag2:First, ensure that you have the necessary packages installed. If you haven't already, installros2bagand the storage backend (e.g.,rosbag2for SQLite3) using the following command:
sudo apt-get install ros-<distro>-ros2bag ros-<distro>-rosbag2Replace <distro> with the name of your ROS2 distribution (e.g., foxy, galactic, rolling).
- Source your ROS2 workspace:
Before using ROS2 commands, you need to source your ROS2 workspace. To do this, run the following command in your terminal:
source /opt/ros/<distro>/setup.bashReplace <distro> with the name of your ROS2 distribution.
- Start your ROS2 system:
Launch your ROS2 nodes or system so that the topics you want to record are being published. This can be done using the ros2 launch command or by starting individual nodes manually.
- Record data with
ros2 bag:
To record data from specific topics, use the following command:
ros2 bag record -o <output_directory> <topic1> <topic2> ...Replace <output_directory> with the desired directory for storing the recorded data and <topic1>, <topic2>, ... with the names of the topics you want to record.
If you want to record data from all available topics, use the following command:
ros2 bag record -a -o <output_directory>
- Stop the recording:
To stop the recording, press Ctrl+C in the terminal where the ros2 bag record command is running. The recorded data will be saved as a .db3 file in the specified output directory.
- Play back recorded data (optional):
If you want to play back the recorded data, use the following command:
ros2 bag play <output_directory>/<bag_file>Replace <output_directory> with the directory where the recorded data is stored and <bag_file> with the name of the .db3 file containing the recorded data.
Keep in mind that the ros2 bag tool can be configured with additional options, such as compression, filtering, or specifying a custom storage backend. You can learn more about these options by referring to the ROS2 documentation or running ros2 bag --help in your terminal.