Appearance
olive® Quick Start
Quick Info
Find the most relevant information below and the quick setup guide in the following section.
| Item | Value |
|---|---|
| Default Device IP address | 192.168.7.100 |
| Default Host IP address | 192.168.7.200 |
| Web GUI address | http://192.168.7.100 |
| User name | olive |
| Password | one |
| ROS1 Version (via bridge) | Noetic |
| ROS2 Version (native) | Humble |
| Default ROS topic names | /olive/<device type>/<device id>/<parameter> |
| Base OS | Debian 11 Bullseye |
Setup
This quick start guide shows you how to get any Olive Robotics component up and running:
- Install ROS2 (https://docs.ros.org/en/humble/index.html) on your host computer. This will provide the necessary tools and libraries to communicate with the Olive Robotics modules and a host computer.
- Connect the Olive Robotics modules to your host computer using the USB Type C cables.
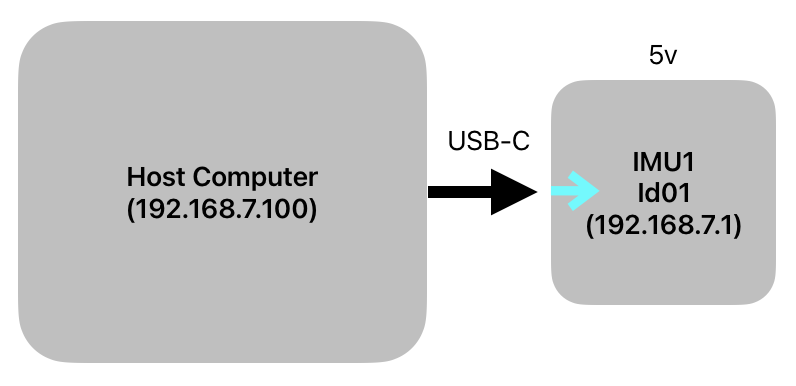
- Wait for the Olive component to boot and establish a connection to your network computer. This may take up to 30 seconds. Each module ships with a default static IP address assigned to it. The default address for smart components is
192.168.7.100. It can be changed later via the web interface. Make sure you set a static ip address192.168.7.200for your host computer.
This is the default network connection diagram:

- You can check the if the connection is established in two ways:
- ping the device using the following command in your terminal:
ping 192.168.7.100ping 192.168.7.100If the module is connected successfully, you should see something like this:
PING 192.168.7.100 (192.168.7.100) 56(84) bytes of data.
64 bytes from 192.168.7.100: icmp_seq=1 ttl=64 time=0.402 ms
64 bytes from 192.168.7.100: icmp_seq=2 ttl=64 time=0.371 ms
64 bytes from 192.168.7.100: icmp_seq=3 ttl=64 time=0.397 ms
64 bytes from 192.168.7.100: icmp_seq=4 ttl=64 time=0.398 ms
PING 192.168.7.100 (192.168.7.100) 56(84) bytes of data.
64 bytes from 192.168.7.100: icmp_seq=1 ttl=64 time=0.402 ms
64 bytes from 192.168.7.100: icmp_seq=2 ttl=64 time=0.371 ms
64 bytes from 192.168.7.100: icmp_seq=3 ttl=64 time=0.397 ms
64 bytes from 192.168.7.100: icmp_seq=4 ttl=64 time=0.398 ms- Check if the network adapter is attached and recognized by your host computer.
ifconfigifconfigIf the device is recognized successfully, you should see something like this:
enxa8de9b838d35: flags=4163<UP,BROADCAST,RUNNING,MULTICAST>  mtu 1500
        inet 192.168.7.200  netmask 255.255.255.0  broadcast 10.42.0.255
        inet6 fe80::ef0a:e686:27aa:6307  prefixlen 64  scopeid 0x20<link>
        ether a8:de:9b:83:8d:35  txqueuelen 1000  (Ethernet)
        RX packets 1846  bytes 272143 (272.1 KB)
        RX errors 0  dropped 0  overruns 0  frame 0
        TX packets 195  bytes 34984 (34.9 KB)
        TX errors 0  dropped 0 overruns 0  carrier 0  collisions 0
enxa8de9b838d35: flags=4163<UP,BROADCAST,RUNNING,MULTICAST> mtu 1500
inet 192.168.7.200 netmask 255.255.255.0 broadcast 10.42.0.255
inet6 fe80::ef0a:e686:27aa:6307 prefixlen 64 scopeid 0x20<link>
ether a8:de:9b:83:8d:35 txqueuelen 1000 (Ethernet)
RX packets 1846 bytes 272143 (272.1 KB)
RX errors 0 dropped 0 overruns 0 frame 0
TX packets 195 bytes 34984 (34.9 KB)
TX errors 0 dropped 0 overruns 0 carrier 0 collisions 0TIP
Note that the MAC address of Olive components shown next to ether ... always starts with a8:
Check if the data is already being published via ROS2 to your system using:
ros2 topic listros2 topic listYou should be able to see all the topics published from the module. For example for IMU module you will see:
/olive/imu/id001/filtered_imu
/olive/imu/id001/filtered_ahrs
/olive/imu/id001/status
/parameter_events
/rosout
/olive/imu/id001/filtered_imu /olive/imu/id001/filtered_ahrs /olive/imu/id001/status /parameter_events /rosoutVisualize the data and change the parameters like IP address, topic name, etc. using the embedded web interface. You just need to open your browser on your host computer and enter the IP address of the device. If you didn't change the IP address, then it must be the default IP address
192.168.7.100.
Want to explore more?
Install the Olive Robotics ROS2 example packages. This will provide the necessary code and examples to access the data and functionality of the Olive Robotics modules on your host computer. You can find them at https://github.com/olive-robotics.
Launch the ROS2 examples for the Olive Robotics modules that you want to use. This will start the communication between the modules and your host computer, and will provide access to the data and functionality of the modules.
Use the ROS2 software to configure the settings and parameters of the Olive Robotics modules, such as the sample rate and range for the sensors and actuators.
Use the ROS2 tools to view and analyze the data from the Olive Robotics modules, and to troubleshoot any issues or problems.
If you need more control over the device you can use the secure shell SSH to log into it from your host computer. To do so, use the user name
oliveand passwordone.