Appearance
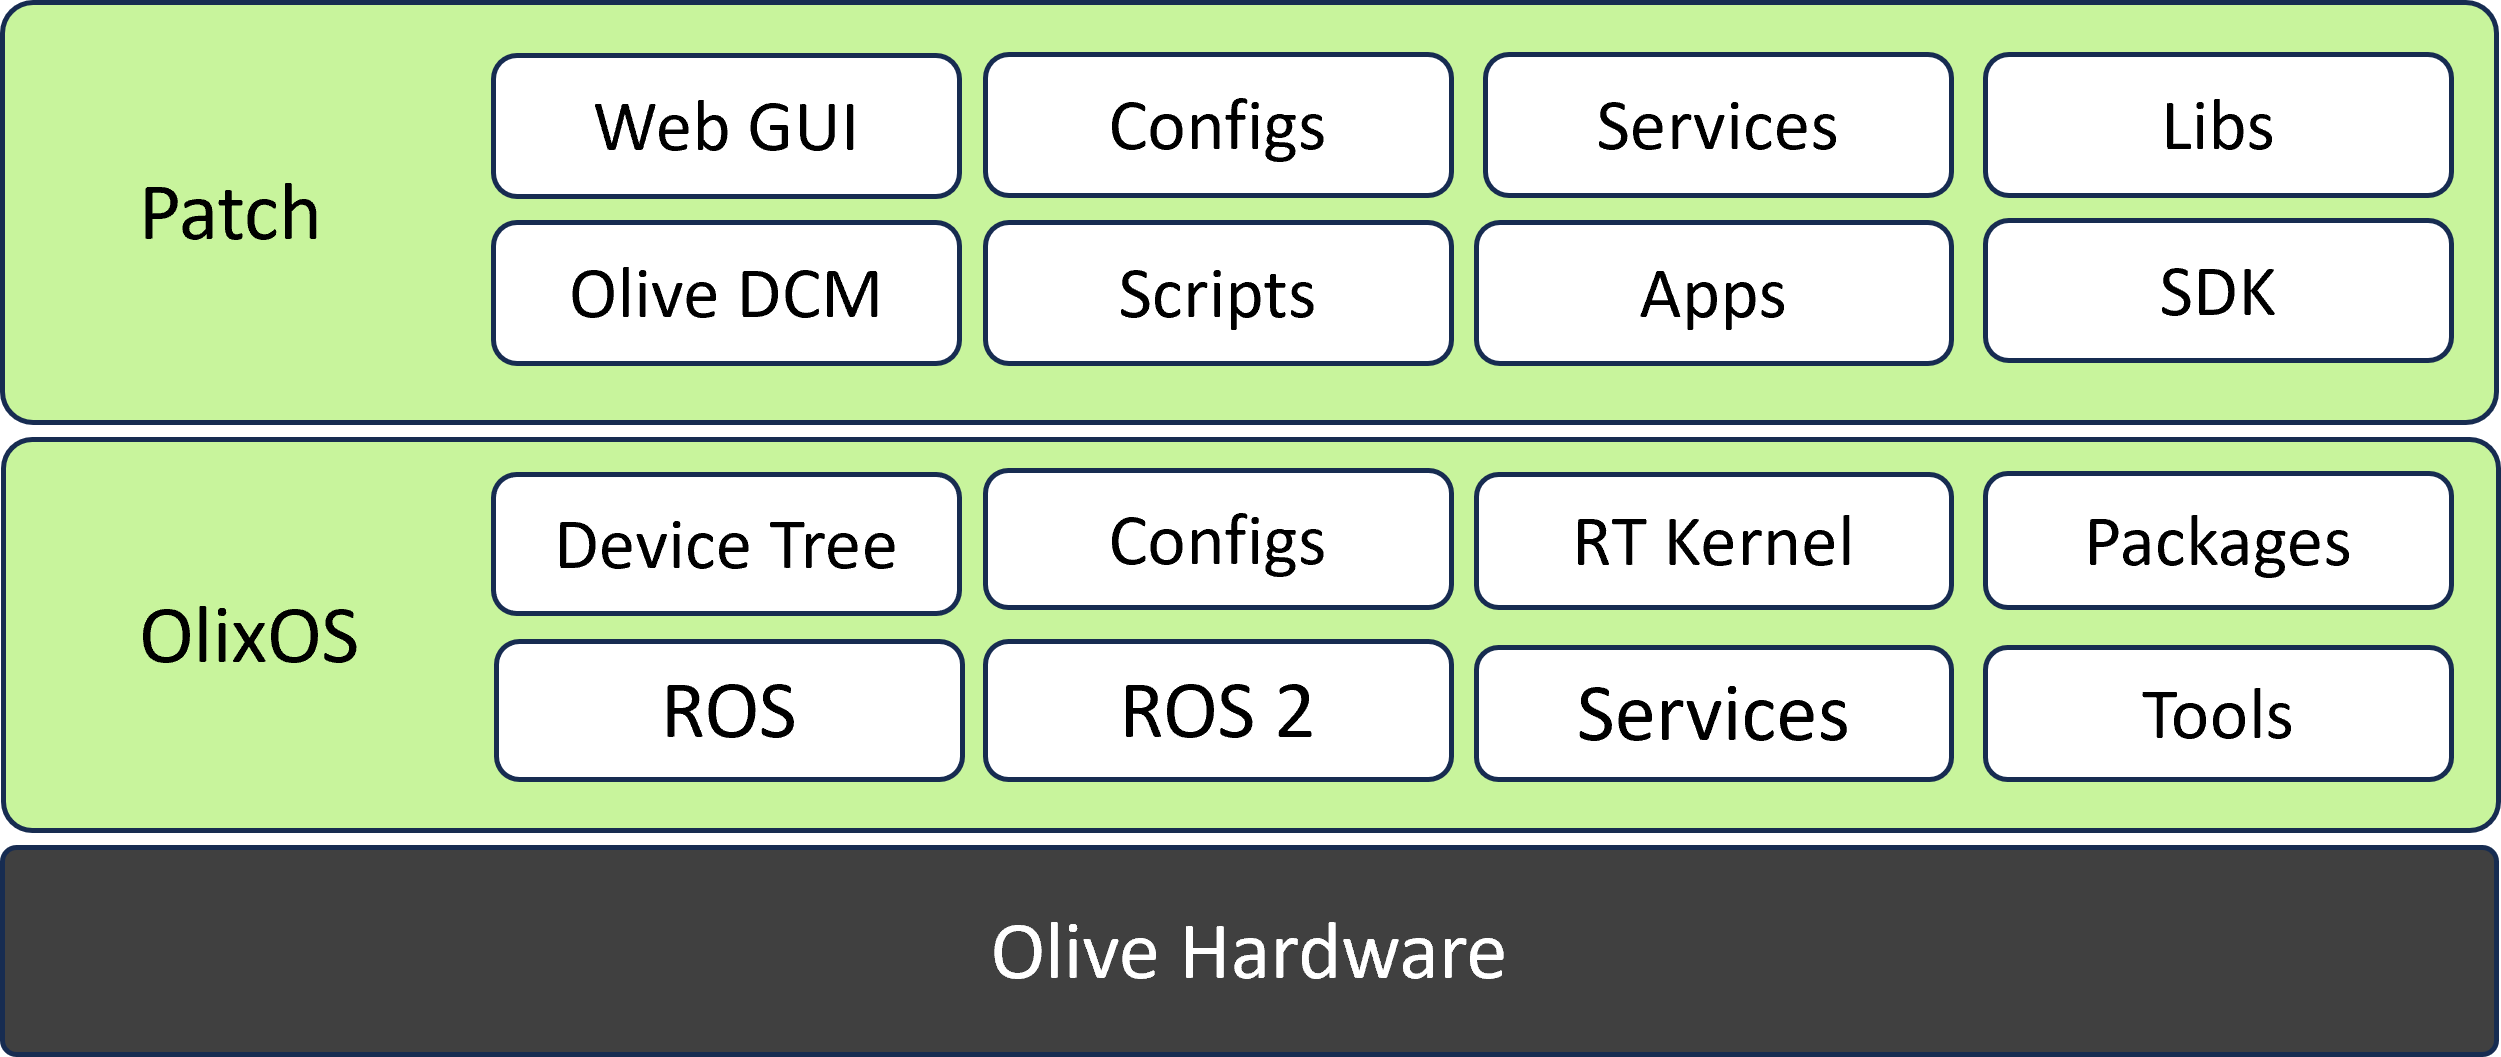
Olix-OS Real-Time Linux for Robotics
Olix-OS Linux is a version of the Linux operating system that is optimized for use on embedded systems, which are small, resource-constrained devices that are used in a wide range of applications such as industrial automation, consumer electronics, and the Internet of Things (IoT).
Olix-OS Linux is typically built using a small subset of the Linux kernel and a minimal set of user-space utilities and libraries. This allows it to run on devices with limited memory and processing power, and it also reduces the size of the operating system, making it more suitable for embedded systems.
Olix-OS Linux can be built using various build systems such as Yocto Project, Buildroot, and OpenEmbedded. These build systems provide pre-configured Linux distributions, which can be customized to suit the specific requirements of the embedded system. They also provide a set of tools for building and managing the Linux system, including the kernel, bootloader, and user-space utilities and libraries.
Olix-OS Linux is also highly configurable, which allows developers to fine-tune the operating system to meet the specific requirements of the embedded system. This includes configuring the kernel and user-space libraries, optimizing the system for performance, and selecting the appropriate drivers and software components.
One of the advantages of using Olix-OS Linux is that it is open-source, which means that developers have access to the source code of the operating system and can modify it to suit their needs. Additionally, embedded Linux has a large and active community of developers, which means that there is a wealth of documentation, support, and development tools available.
Overall, embedded Linux is a versatile and powerful operating system that is well-suited for use on embedded systems. It provides a small footprint and configurability, as well as a large library of pre-built software, making it a popular choice for developers and manufacturers alike.
Config Files
Olive config files are located at
/opt/olive/config/current/opt/olive/config/current
Here, for each component type, you will see a separate folder containing two types of YAML files. The first type is the config files, which are related to startup configurations, and the second type is the param files, which are related to real-time ROS parameter interactions.
Autorun your custom application
If you would like to enable autorun behavior for your custom application within the Olive components, you can add the executable command at the end of the app loader script. You can extend the script and add your logic to it.
/usr/bin/olive-app-loader.sh/usr/bin/olive-app-loader.shRestarting Services
After ssh in your component, you can start, stop or restart olive dcm services by using this commands.

for eio:
sudo systemctl restart olive-dcm-eio.servicesudo systemctl restart olive-dcm-eio.servicefor camera:
sudo systemctl restart olive-dcm-camera.servicesudo systemctl restart olive-dcm-camera.servicefor imu:
sudo systemctl restart olive-dcm-imu.servicesudo systemctl restart olive-dcm-imu.servicefor servo:
sudo systemctl restart olive-dcm-servo.servicesudo systemctl restart olive-dcm-servo.servicefor system:
sudo systemctl restart olive-dcm-system.servicesudo systemctl restart olive-dcm-system.servicefor manager:
sudo systemctl restart olive-sys-manager.servicesudo systemctl restart olive-sys-manager.servicefor app loader:
sudo systemctl restart olive-app-loader.servicesudo systemctl restart olive-app-loader.serviceFirmware Releases
| Format | Version | Link |
|---|---|---|
| Compressed IMG | 1.3.2 | download |
| Compressed IMG | 2.2.0 | download |
| Compressed IMG | 2.2.1 | download |
How can i see what is my current Software Patch?
In the Olive GUI dashboard in the device status group box you can see your current firmware version.
Flashing a New Image with Etcher Software
Introduction
Etcher is a free and open-source utility used to write image files such as .iso and .img files, as well as zipped folders onto storage media to create live SD cards and USB flash drives. It's widely used to flash OS images for Raspberry Pi, Arduino, and many other applications. Etcher is developed by balena, and it's available for Windows, macOS, and Linux.
Prerequisites
- An image file you want to flash, typically with a
.isoor.imgextension. (unzip the firmware file if it is compressed) - A USB drive or SD card with enough storage to accommodate the image file. (32 Gb or more)
- A computer with Etcher installed.
Step-by-Step Guide to Flashing an Image with Etcher
Step 1: Download and Install Etcher
- Navigate to Etcher's official download page.
- Choose the version of Etcher that corresponds to your operating system (Windows/macOS/Linux).
- Download the installer and run it. Follow the on-screen instructions to install Etcher on your system.
Step 2: Prepare Your USB Drive or SD Card
- Insert the USB drive or SD card into your computer.
- Ensure that there is no important data on the drive, as the flashing process will erase everything on it.
Step 3: Open Etcher and Select Image
- Open Etcher on your computer.
- Click on the “Flash from file” button.
- Navigate to the location where your image file is stored, select it, and click “Open” (or an equivalent, depending on your OS).
Step 4: Select Target
- Click on the “Select target” button.
- Choose your USB drive or SD card from the list. Be very careful to select the correct drive, as all data on the drive will be erased.
- Click “Connect” (or equivalent).
Step 5: Flash the Image
- Click on the “Flash!” button.
- Etcher will format the drive and write the image file to the USB drive or SD card. This process may take some time, depending on the size of the image file and the speed of the drive.
- Once the flashing process is complete, Etcher will validate the write to ensure it was successful.
Step 6: Eject Safely
- Once the flashing process is complete and validated, you can close Etcher.
- Eject the USB drive or SD card safely from your computer.
Step 7: Use the Flashed Drive
- You can now use the USB drive or SD card to boot a computer or power a device (such as a Raspberry Pi) depending on the image you flashed.
Troubleshooting Tips
- If Etcher fails to flash the image, try using a different USB port or card reader.
- Ensure that the image file is not corrupted. You might re-download the file or check its integrity if possible.
- Make sure your USB drive or SD card has enough space for the image file.
- If you experience persistent issues, consult the Etcher's GitHub repository or community forums for assistance.
Patch Update
Releases
| Format | Version | Min Firmware | Link | Note |
|---|---|---|---|---|
| SWU | 809 | 1.3.2 | download | - |
| SWU | 847 | 2.2.0 | download | - |
| SWU | 848 | 2.2.0 | download | - |
| SWU | 1004 | 2.2.0 | download | IMU v2.0 |
| SWU | 1025 | 2.2.0 | download | IMU v2.1 |
| SWU | 1026 | 2.2.0 | download | IMU v2.1 (No Magnetometer / Relative AHRS) |
| SWU | 1178 | 2.2.0 | download | IMU / CAM / Servo v2.3 |
| SWU | 1215 | 2.2.0 | download | IMU / CAM / Servo v2.4 |
| SWU | 1254 | 2.2.0 | download | IMU / CAM / Servo v2.5 |
| SWU | 1297 | 2.2.0 | download | IMU / CAM / Servo / EIO (Preview, not official) v2.5 |
1) If you are updating a patch for the first on a fresh OlixOS
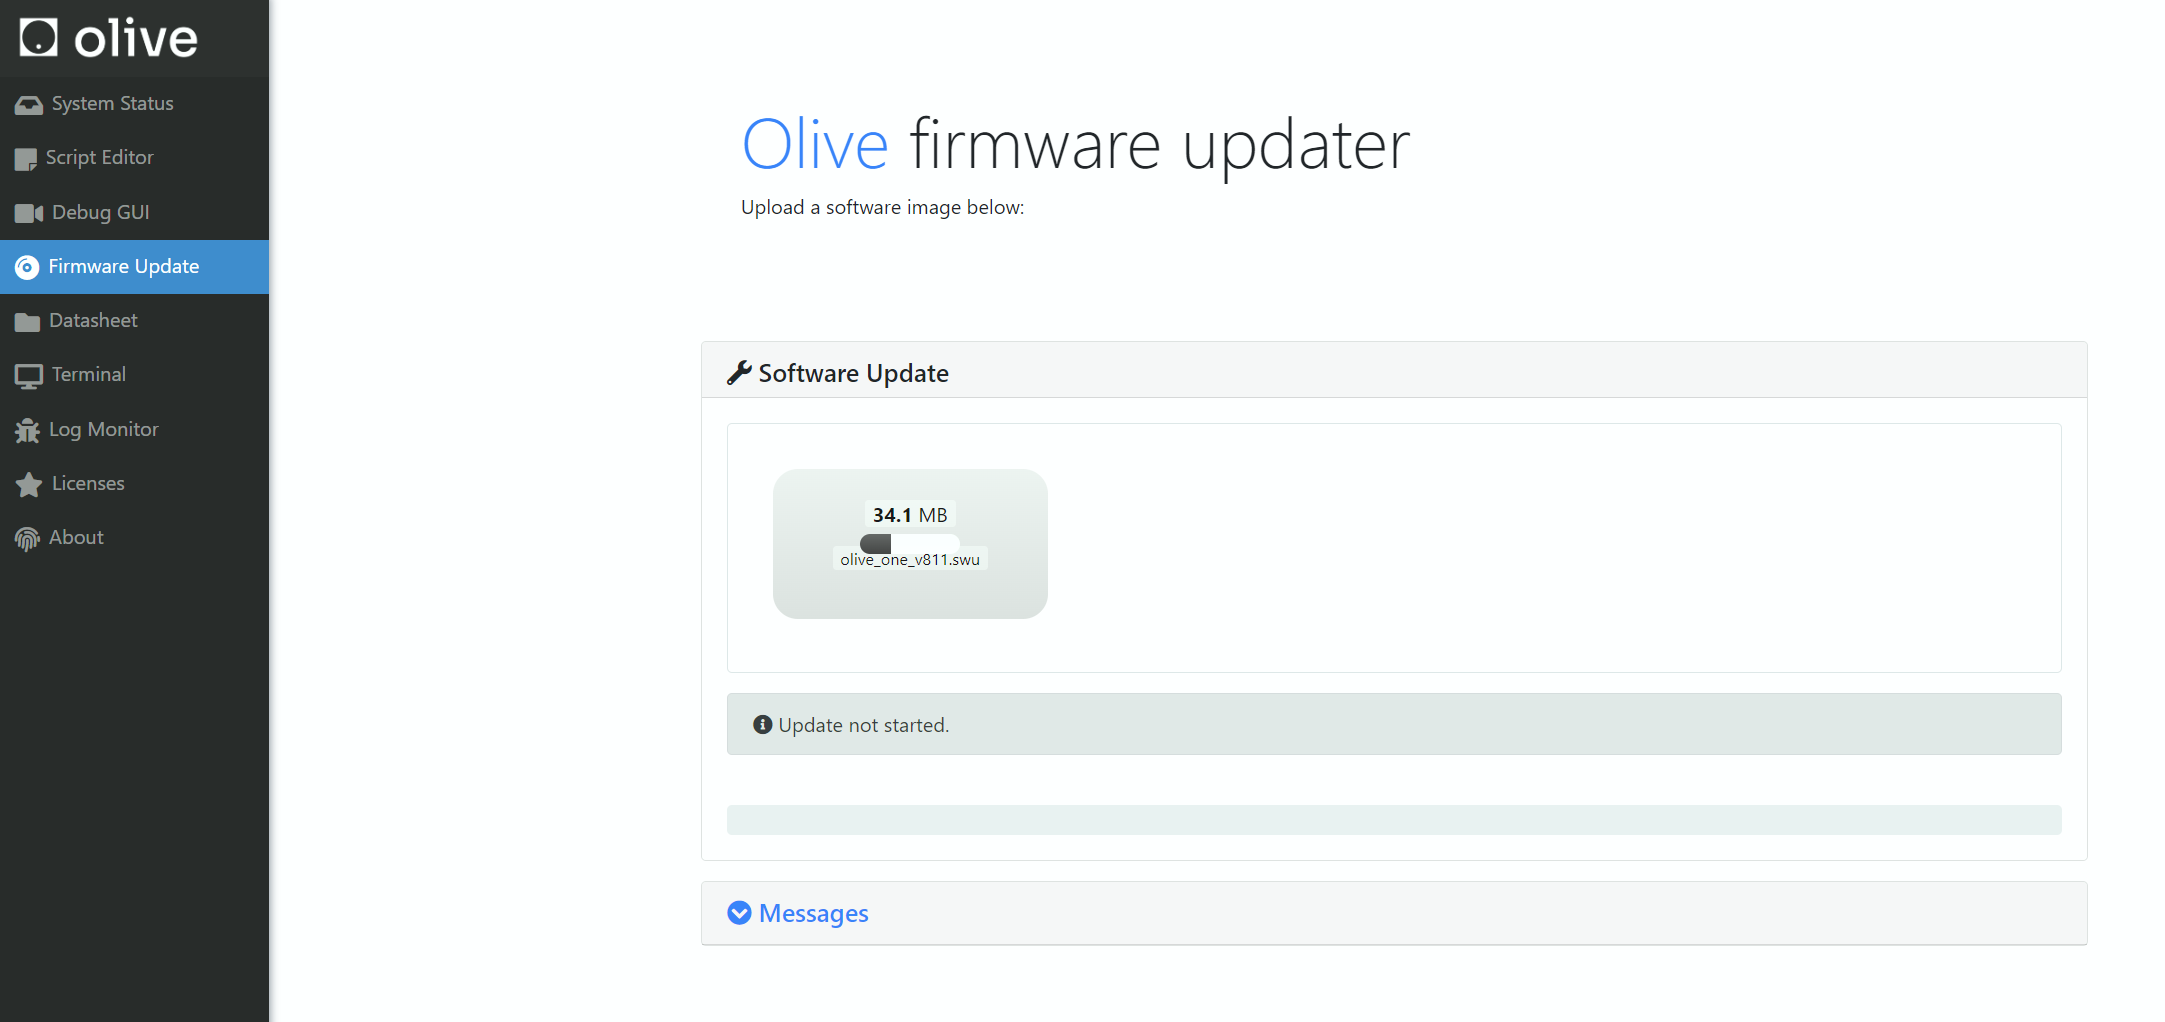
Fist open the update screen on your browser by going to <device_ip>:7070
then browse or drag and drop the (.swu) file olive_one_x.swu to the upload area. Then wait for a minute to software patch updater applies the software patch on your fresh OlixOS.
2) If you are updating a patch on a working OlixOS
Fist open the update screen by simply going to <device_ip> then select the Firmware Update from the left panel.
then browse or drag and drop the (.swu) file olive_one_x.swu to the upload area. Then wait for a minute to software patch updater applies the software patch on your current OlixOS.
How can i see what is my current Software Patch?
In the Olive GUI dashboard in the device status group box you can see your current software patch version